Introduction
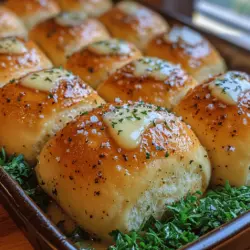
Unleash the aroma of freshly baked rolls with our Garlic Herb Bliss Rolls recipe. These deliciously soft and buttery rolls are infused with the flavors of garlic and fresh herbs, making them a perfect accompaniment to any meal or a delightful snack on their own. Imagine pulling apart a warm, fluffy roll, with the scent of garlic wafting through your kitchen, inviting everyone to the table. In this article, we will explore the origins of these rolls, break down the ingredients and steps involved in making them, and highlight the many ways they can be enjoyed.
Understanding Garlic Herb Bliss Rolls
Bread rolls have long held a significant place in culinary traditions across the globe. From the crusty baguettes of France to the fluffy dinner rolls served in American households, bread is more than just a staple; it is a symbol of comfort and community. The Garlic Herb Bliss Rolls draw on this rich heritage, combining the universal appeal of bread with the aromatic allure of garlic and fresh herbs.
Garlic, known for its robust flavor and numerous health benefits, serves as a powerful ingredient that elevates the taste profile of these rolls. When combined with herbs such as rosemary, thyme, or parsley, the flavors meld beautifully, creating a harmonious balance that enhances any dish. These rolls not only complement a hearty meal but can also shine on their own, making them a versatile addition to any bread basket.
The Allure of Homemade Bread
There is something truly special about making bread from scratch. The process is both an art and a science, allowing bakers to connect with their ingredients while creating something nourishing and delightful. One of the greatest benefits of homemade bread is the control it offers over ingredients. You can choose high-quality flour, opt for organic herbs, or adjust the amount of salt to suit your taste. This level of customization ensures that the final product meets your personal preferences.
Moreover, the joy of baking is unparalleled. Kneading the dough, watching it rise, and finally shaping it into rolls can be a meditative experience. The anticipation builds as the rolls bake in the oven, filling your home with an irresistible aroma. When you finally pull the golden-brown rolls from the oven, you experience not only satisfaction but also pride in having created something delicious from scratch.
Ingredients Breakdown
To create our Garlic Herb Bliss Rolls, you’ll need the following ingredients. Each component plays a critical role in achieving the perfect texture and flavor.
Flour
Flour is the foundation of any bread roll, providing structure and texture. For this recipe, all-purpose flour is ideal because it strikes a balance between protein content and versatility. The proteins in flour, when combined with water and kneaded, form gluten, which gives the rolls their chewiness and elasticity.
Yeast
The leavening agent in this recipe is instant yeast, which is favored for its convenience and reliability. Unlike active dry yeast, instant yeast does not require proofing in warm water, making the baking process quicker. It’s essential to ensure that the yeast is fresh, as expired yeast can hinder the rising process.
Sugar
Granulated sugar serves multiple purposes in this recipe. Not only does it add a touch of sweetness, but it also plays a crucial role in browning the rolls during baking. Sugar feeds the yeast, promoting fermentation and contributing to a soft, tender crumb.
Salt
Salt is a vital ingredient in any bread recipe. It enhances the flavors of the other ingredients and helps to strengthen the gluten structure, contributing to the overall texture of the rolls. However, it’s important to use the right amount; too much salt can inhibit yeast activity, leading to dense rolls.
Milk
Milk is used in this recipe to enrich the dough and provide moisture. The warmth of the milk helps to activate the yeast, promoting a good rise. You can use whole milk for a richer flavor or opt for a dairy-free alternative if preferred.
Butter
Butter adds richness and flavor to the rolls. In this recipe, melted butter is incorporated into the dough, while additional melted butter is reserved for brushing the tops of the rolls before baking. This not only enhances the flavor but also helps achieve a beautiful golden crust.
Eggs
Eggs act as a binding agent in the dough, contributing to its moisture and richness. They also help with the browning of the rolls, creating a lovely, golden exterior.
Garlic and Herbs
The stars of this recipe are undoubtedly the garlic and herbs. Fresh garlic provides a pungent flavor that infuses the rolls, while fresh herbs like rosemary, thyme, or parsley add aromatic notes. While fresh herbs are recommended for their vibrant flavor, dried herbs can be used if fresh ones are unavailable.
Black Pepper
A subtle hint of black pepper adds a depth of flavor that pairs perfectly with the garlic and herbs. It’s a small but impactful addition that balances the overall taste of the rolls.
Flaky Sea Salt
For those who prefer an extra burst of flavor, a sprinkle of flaky sea salt on top of the rolls just before baking is an excellent option. It adds a delightful crunch and enhances the overall taste experience.
Step-by-Step Guide to Making Garlic Herb Bliss Rolls
Now that we’ve explored the ingredients and their significance, let’s dive into the step-by-step process of making Garlic Herb Bliss Rolls. The first crucial step is activating the yeast.
Activating the Yeast
Activating the yeast is a fundamental step in the bread-making process. Begin by measuring out the warm milk—ideally, it should be between 100°F to 110°F (37°C to 43°C). This temperature range is optimal for activating the yeast without killing it. If the milk is too hot, it can damage the yeast, leading to poor rise and dense rolls.
Once the milk is at the right temperature, combine it with the sugar in a mixing bowl. Stir gently until the sugar dissolves. Next, sprinkle the instant yeast over the surface of the milk. Allow it to sit undisturbed for about 5 to 10 minutes. During this time, you should see bubbles forming and the mixture becoming frothy, indicating that the yeast is active and ready to work its magic in the dough.
As we continue through this recipe, you will appreciate the meticulous attention to detail required to achieve the perfect Garlic Herb Bliss Rolls. The combination of high-quality ingredients, careful preparation, and the joy of baking will culminate in a delightful treat that is sure to impress. Stay tuned for the next section, where we will detail the remaining steps to create these heavenly rolls!
{{image_2}}
Making the Dough
To create the perfect Garlic Herb Bliss Rolls, you’ll need to start with a well-mixed dough. Begin by combining your dry ingredients in a large mixing bowl. This typically includes all-purpose flour, sugar, salt, and instant yeast. Whisk these dry ingredients together thoroughly to ensure even distribution.
Meanwhile, in a separate bowl, combine your wet ingredients: warm water (or milk if you prefer a richer dough), melted butter, and an egg. The warmth of the liquid should be just right—too hot and you risk killing the yeast, too cold and it won’t activate. Once mixed, pour the wet ingredients into the bowl with the dry ingredients. Use a spatula or wooden spoon to stir until a shaggy dough forms.
Incorporating Flour
As you mix, you may find that the dough is stickier than you’d like. This is where the right method of incorporating flour comes into play. Gradually add more flour, a couple of tablespoons at a time, until the dough pulls away from the sides of the bowl. It’s important not to add too much flour at once; this could lead to a dense roll. Aim for a dough that is slightly tacky but manageable.
Kneading
Kneading the dough is crucial for developing gluten, which gives your rolls their fluffy texture. Turn the dough out onto a lightly floured surface. Using the heel of your hand, push the dough away from you, then fold it back over itself. Rotate the dough a quarter turn and repeat this process. Knead for about 8-10 minutes, or until the dough is smooth and elastic. A well-kneaded dough will spring back when you poke it with your finger.
First Rise
Once kneaded, place the dough in a lightly greased bowl, cover it with a damp cloth or plastic wrap, and let it rise in a warm, draft-free area. This first rise is essential for allowing the yeast to work its magic. The dough should double in size within 1 to 1.5 hours. The science behind this process involves yeast fermentation, where the yeast consumes the sugars in the dough, producing carbon dioxide gas that causes the dough to expand.
Forming the Rolls
After the dough has risen, it’s time to shape your rolls. Punch down the dough gently to release any gas bubbles formed during the rise. Turn the dough out onto a floured surface and divide it into equal portions, usually about 12 to 15 pieces, depending on how large you want your rolls.
To shape each piece into a roll, take one piece of dough and pull the edges toward the center, pinching them together to create a smooth top. Flip the dough over so the seam side is down, and gently roll it between your palms to form a ball. Place the shaped rolls on a parchment-lined baking sheet, leaving space between each one to allow for expansion during the second rise.
Second Rise
Cover the rolls with a clean kitchen towel and let them rise again for about 30-45 minutes. This second rise is just as important as the first. It allows the rolls to relax and expand further, resulting in light and airy rolls. Be patient during this stage; the rolls should puff up significantly before baking.
Baking
Preheat your oven to 375°F (190°C). Once your rolls have completed their second rise, it’s time to bake them to golden perfection. Place the baking sheet in the oven and bake for 20-25 minutes, or until the rolls are a beautiful golden brown on top. To check for doneness, tap the top of a roll; it should sound hollow. You can also use a thermometer; the internal temperature should read around 190°F (88°C).
Cooling and Serving
After baking, remove the rolls from the oven and allow them to cool on the baking sheet for about 5 minutes before transferring them to a wire rack. This will help them maintain their crisp crust. Serve your Garlic Herb Bliss Rolls warm, ideally brushed with a little extra melted butter and garnished with fresh herbs for added flavor.
Tips for Perfecting Garlic Herb Bliss Rolls
Ingredient Substitutions
If you have dietary preferences or restrictions, there are several substitutions you can make without compromising flavor. For a dairy-free option, substitute the butter with a plant-based alternative and use almond or oat milk instead of regular milk. You can also replace the egg with a flaxseed meal mixture (1 tablespoon of flaxseed meal mixed with 2.5 tablespoons of water, let it sit for a few minutes until it thickens) to keep the rolls vegan-friendly.
Flavor Variations
Feel free to experiment with different herbs and spices to customize your rolls. Adding fresh rosemary or thyme can provide a delightful twist, while a pinch of cayenne pepper can introduce a subtle heat. You might also consider incorporating grated cheese like Parmesan or cheddar into the dough for a cheesy garlic roll variation.
Storage and Reheating
To keep your rolls fresh, store them in an airtight container at room temperature for up to three days. If you want to enjoy them beyond that, consider freezing them. Place the cooled rolls in a freezer-safe bag, and they can last for up to three months. When you’re ready to enjoy them, simply reheat from frozen in a 350°F (175°C) oven for about 10-15 minutes until warmed through.
Serving Suggestions
As a Side Dish
Garlic Herb Bliss Rolls are incredibly versatile and make for an excellent side dish. Pair them with hearty soups, fresh salads, or main courses like roasted chicken or grilled steak. Their garlic and herb flavor enhances any dish, making them a welcome addition to your dining table.
For Breakfast
Transform your rolls into a delicious breakfast sandwich. Slice a roll in half and fill it with scrambled eggs, cheese, and your choice of breakfast meat for a satisfying morning meal. The soft, fluffy texture of the rolls makes them perfect for holding fillings without falling apart.
With Dips
Enhance your Garlic Herb Bliss Rolls by serving them with dips. A simple mixture of olive oil and balsamic vinegar makes for a classic pairing. You can also whip up a herb butter by mixing softened butter with minced garlic, chopped herbs, and a pinch of salt. This compound butter can be spread on warm rolls for an extra burst of flavor.
Nutritional Information
Each Garlic Herb Bliss Roll contains approximately 150 calories, 5g of protein, 4g of fat, and 25g of carbohydrates. They also provide essential nutrients from the herbs used, contributing to a balanced diet. Pairing these rolls with nutrient-rich sides can create a wholesome meal that satisfies both your cravings and nutritional needs.
Conclusion
Garlic Herb Bliss Rolls are more than just a side dish; they are a culinary experience that brings warmth and comfort to any dining table. With this guide, you can create these delightful rolls at home, sharing their heavenly aroma and taste with family and friends. Enjoy the process of baking and the joy that comes with it, knowing that you’ve crafted something truly special from scratch. Whether enjoyed fresh from the oven or transformed into a creative dish, these rolls are sure to impress and satisfy every palate. Happy baking!