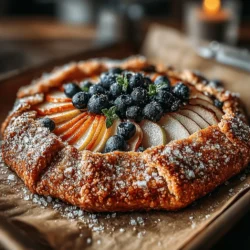
Pear & Blueberry Galette Delight: A Rustic Dessert to Savor
When it comes to desserts that bring together the best of seasonal flavors, few can rival the charm and simplicity of a Pear & Blueberry Galette. This rustic pastry not only highlights the natural sweetness of ripe pears, but it also showcases the delightful tartness of fresh blueberries, creating a harmonious blend that is sure to please the palate. The galette, with its free-form structure, embodies a casual elegance that invites everyone to indulge, making it a favorite in both home kitchens and professional bakeries alike.
Galettes have their roots in French cuisine, where they are celebrated for their versatility and ease of preparation. Unlike traditional pies that require a pie dish and often meticulous crimping along the edges, galettes are a more relaxed option. The dough is rolled out into a rough circle, filled with fruit, and then folded over the edges to create a beautiful, rustic look. This straightforward approach not only saves time but also allows for creative expression in the kitchen.
What sets the Pear & Blueberry Galette apart is its commitment to using fresh, high-quality ingredients. The combination of juicy, ripe pears with tart blueberries creates a balanced flavor profile that is both refreshing and satisfying. This dessert is not just about taste; it’s also about using what is in season, which enhances the overall experience. The natural sweetness of the fruit shines through, and the flaky, buttery crust serves as the perfect complement, making each bite a delightful experience.
Understanding Galettes
To truly appreciate the Pear & Blueberry Galette, it’s essential to understand what a galette is. At its core, a galette is a free-form pastry that can be filled with a variety of ingredients, whether sweet or savory. Originating from France, the word “galette” refers to a flat, round cake or pastry made from a variety of ingredients, often including flour, butter, and water. This simple composition allows for numerous variations, making galettes a versatile choice for any meal.
What makes galettes particularly appealing is their simplicity. Unlike traditional pies, which require a carefully crafted crust and precise baking times, galettes offer a more forgiving approach. The crust can be slightly rustic, and the filling can be heaped in without fear of it overflowing, as the edges are simply folded over the filling before baking. This makes galettes not only easier to prepare but also a great option for those who may be intimidated by pie-making.
The rustic nature of galettes also contributes to their status as comfort food. They embody a sense of homeliness and warmth, evoking memories of family gatherings and cozy afternoons spent baking in the kitchen. Whether served warm with a scoop of vanilla ice cream or enjoyed at room temperature with a cup of coffee, galettes are the perfect dessert for any occasion.
Ingredients Breakdown
Before diving into the preparation of this delicious Pear & Blueberry Galette, it’s crucial to understand the key components that will make this dish shine. The ingredients can be divided into two main categories: the dough for the crust and the filling.
For the Galette Dough:
– All-Purpose Flour: This is the primary ingredient for the crust, providing structure and texture.
– Unsalted Butter: Key to achieving a flaky crust, the butter should be cold and cubed to ensure it integrates properly into the dough.
– Sugar: A small amount of sugar adds a touch of sweetness to the crust, balancing the flavors of the filling.
– Salt: Enhances the overall taste of the dough.
– Ice Water: Used to bring the dough together, it must be added gradually to ensure the right consistency.
For the Fruit Filling:
– Pears: Choose ripe but firm pears for the best flavor and texture. Varieties like Bartlett or Anjou work wonderfully.
– Blueberries: Fresh blueberries are preferred, as they burst with flavor when baked. If fresh blueberries are out of season, frozen ones can be substituted, but be sure to drain excess moisture.
– Lemon Juice: A splash of lemon juice brightens the flavors of the fruit and helps to balance the sweetness.
– Cornstarch or Flour: Used to thicken the filling and absorb some of the juices released during baking.
– Cinnamon: A hint of cinnamon can enhance the flavor profile, adding warmth and depth to the galette.
Using fresh produce is paramount in this recipe. Ripe pears offer a juicy sweetness that pairs beautifully with the tartness of the blueberries, creating a delightful contrast. When selecting your ingredients, look for fruits that are in season to ensure the best flavor and texture. If you’re feeling adventurous, consider experimenting with other fruits such as peaches, raspberries, or even apples, all of which can provide their own unique twist on the galette.
For those with dietary restrictions, there are also alternative ingredient options. Gluten-free flour can be substituted for all-purpose flour, and coconut oil or a vegan butter alternative can replace traditional butter, making this dessert accessible to a wider audience without compromising on taste.
Preparing the Dough
Now that we’ve discussed the ingredients, it’s time to roll up our sleeves and get started on preparing the galette dough. The preparation of the dough is a crucial step in achieving that flaky, tender crust that will cradle the fruit filling beautifully.
1. Mixing Dry Ingredients: In a large mixing bowl, combine the all-purpose flour, sugar, and salt. Whisk them together to ensure they are evenly mixed.
2. Incorporating Butter: Add the cold, cubed unsalted butter to the flour mixture. Using a pastry cutter, fork, or your fingertips, work the butter into the flour until the mixture resembles coarse crumbs with some pea-sized pieces of butter remaining. This step is vital, as the small bits of butter will create the flaky layers in the crust.
3. Adding Ice Water: Gradually add ice water, one tablespoon at a time, mixing gently with a fork after each addition. Continue until the dough begins to come together but is not sticky. Be cautious not to overwork the dough, as this can lead to a tough crust.
4. Knowing When the Dough is Ready: The dough is ready when it holds together when squeezed but still has visible bits of butter. This is key to achieving that light and flaky texture.
5. Chilling the Dough: Once the dough is prepared, shape it into a disc, wrap it in plastic wrap, and refrigerate for at least 30 minutes. Chilling the dough is essential as it helps to relax the gluten and firm up the butter, making the dough easier to roll out later on.
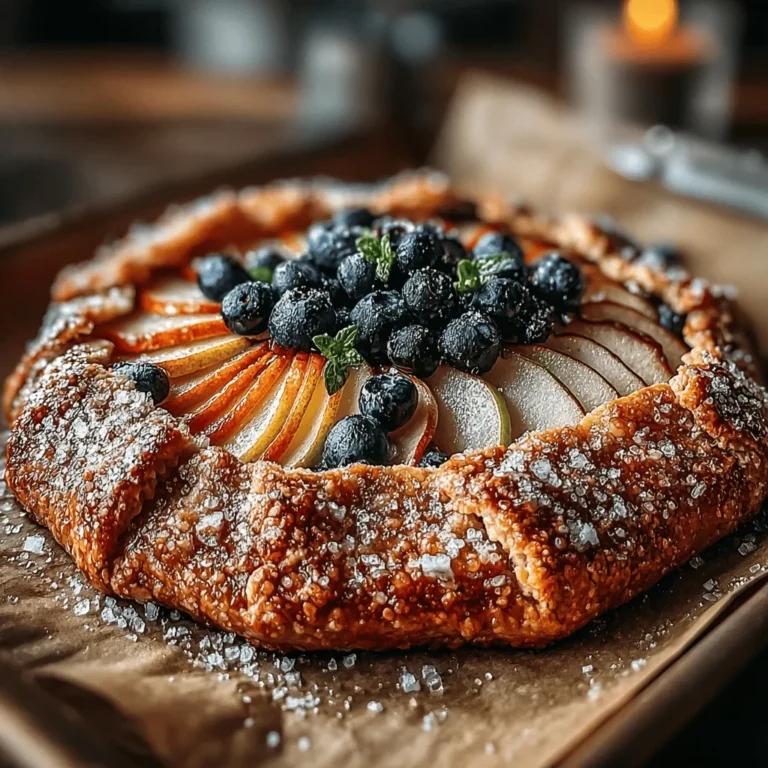
Preparing the Pear & Blueberry Galette dough is a straightforward yet rewarding process. With the right technique and attention to detail, you’ll create a crust that not only complements the fruit filling but also enhances the overall allure of this rustic dessert. As we move forward, the next steps will involve assembling the galette and baking it to perfection, ensuring that every bite is a true delight.
{{image_2}}
Creating the Filling
Selecting and Preparing the Fruit
When it comes to crafting the perfect Pear & Blueberry Galette, the quality of your fruit is paramount. For pears, look for varieties such as Bartlett or Bosc, which offer a sweet, juicy flavor and a smooth texture. Ensure that the pears are ripe but still firm to the touch; this will prevent them from becoming mushy during baking.
For blueberries, choose plump, firm berries that are deep in color. Fresh blueberries are ideal, but if they are out of season, frozen blueberries can also work well—just be sure to thaw and drain them before use to avoid excess moisture in your galette. Rinse both fruits gently under cool water, patting them dry with a paper towel to remove any excess moisture.
Combining Flavors
To elevate the natural sweetness of the pears and blueberries, incorporating lemon juice and vanilla extract is essential. The acidity of the lemon juice not only enhances the flavor but also helps to balance the sweetness of the fruits. Add about one tablespoon of freshly squeezed lemon juice to your fruit mixture.
Next, a splash of pure vanilla extract (about one teaspoon) will infuse the filling with a warm, inviting aroma. To add depth, consider mixing in a pinch of ground cinnamon or nutmeg. These spices complement the fruity flavors beautifully, giving your galette a seasonal touch.
The Role of Cornstarch
Cornstarch plays a critical role in creating the perfect filling texture. As the galette bakes, the cornstarch thickens the fruit juices, preventing the crust from becoming soggy and ensuring that each slice holds its shape. For this recipe, about two tablespoons of cornstarch should suffice. Mix the cornstarch with your fruit mixture, ensuring that the blueberries and pears are well-coated. This step is crucial for achieving a delightful balance between a juicy filling and a crisp crust.
Assembling the Galette
Rolling Out the Dough
Once your filling is ready, it’s time to roll out your chilled dough. Begin by placing your dough on a lightly floured surface. Using a rolling pin, gently roll the dough into a circle about 12 inches in diameter. Aim for a thickness of approximately 1/8 inch; this will ensure a tender yet sturdy crust.
When transferring the rolled dough to your baking sheet, you can either roll it onto the pin and then unroll it over the baking sheet or carefully lift it with your hands. If the dough begins to stick, sprinkle a bit more flour underneath to prevent tearing.
Arranging the Filling
Now comes the fun part—assembling your galette! Spoon the fruit mixture into the center of the rolled-out dough, leaving about a two-inch border around the edges. Gently spread the filling into an even layer, ensuring not to overfill. The beauty of a galette lies in its rustic charm, so don’t worry if the filling isn’t perfectly symmetrical.
To create the classic galette shape, fold the edges of the dough over the fruit. Start at one point and work your way around, making pleats as you go. This technique not only adds visual interest but also helps to contain the filling while allowing the fruit to peek through.
Finishing Touches
For a beautiful golden-brown crust, an egg wash is essential. Whisk one egg with a tablespoon of milk or water, and brush this mixture over the exposed dough. This step will give your galette a lovely sheen and enhance the overall presentation. To add a touch of sweetness and texture, sprinkle a tablespoon of coarse sugar over the crust before baking.
Baking the Galette
Preheating the Oven
For the best results, preheat your oven to 400°F (200°C). This temperature is ideal for creating a crisp, flaky crust while ensuring the fruit filling cooks through. Preheating your oven also helps to create steam, which contributes to a beautifully risen galette.
Baking Time and Indicators of Doneness
Place your assembled galette in the preheated oven and bake it for approximately 35 to 45 minutes. Keep an eye on your galette; it should be golden brown, and the filling should be bubbling. A good indicator of doneness is when the edges of the crust are nicely browned and the fruit filling has thickened and is visibly simmering.
Handling Over-Browning
If you notice that the crust is browning too quickly, you can protect it by covering the edges with strips of aluminum foil. This will shield the crust from direct heat, allowing the galette to bake evenly without burning.
Serving Suggestions
Ideal Serving Temperature
The Pear & Blueberry Galette can be enjoyed warm right out of the oven or at room temperature. Allow the galette to cool for about 10 to 15 minutes after baking, which will help the filling set up a bit more.
Complementary Additions
To elevate your dessert experience, consider serving the galette with a scoop of vanilla ice cream or a dollop of freshly whipped cream. The creamy textures of these toppings contrast beautifully with the flaky crust and juicy filling. For a twist, a drizzle of caramel sauce or a sprinkle of powdered sugar can add an extra layer of indulgence.
Presentation Ideas
To create an inviting presentation, serve slices of the galette on rustic wooden boards or elegant dessert plates. Garnish with fresh mint leaves or a dusting of powdered sugar for that extra touch. For special occasions, consider pairing the galette with a glass of dessert wine or a hot cup of spiced chai for a delightful culinary experience.
Conclusion
Creating a Pear & Blueberry Galette is not just about crafting a delicious dessert; it’s about the joy of making something special from scratch. The marriage of sweet pears and tart blueberries, enveloped in a flaky, buttery crust, makes for a memorable treat that can be enjoyed on any occasion.
Don’t hesitate to experiment with different fruit combinations—try peaches, strawberries, or even apples for a personalized twist. The beauty of this galette lies in its versatility, allowing you to adapt it to your taste preferences and whatever seasonal fruit you have on hand.
Homemade desserts are a wonderful way to create lasting memories with loved ones. Whether you’re sharing a slice at a summer picnic or serving it at a cozy family dinner, the Pear & Blueberry Galette is sure to bring smiles and satisfy cravings. So roll up your sleeves, gather your ingredients, and embark on this delightful baking adventure!