When the sun shines brightly and the temperatures soar, the last thing you want to do is turn on the oven. Enter the Strawberry Dream Cheesecake Icebox Bars, a delightful no-bake dessert that perfectly captures the essence of summer. Combining the creamy richness of cheesecake with the bright, refreshing flavor of fresh strawberries, these icebox bars are an ideal treat for warm-weather gatherings, picnics, or simply a sweet indulgence at home.
No-bake desserts have gained immense popularity in recent years due to their ease of preparation and the ability to create delicious treats without the heat of the oven. This recipe not only saves you from the sweltering heat but also allows the wonderful flavors of strawberries and cream cheese to shine through. The balance of creaminess and fruitiness makes these bars a hit, appealing to cheesecake lovers and fruit enthusiasts alike.
Understanding the Components of the Dessert
To truly appreciate the Strawberry Dream Cheesecake Icebox Bars, it’s important to understand the components that make up this delectable treat. At its core, the dessert features a classic cheesecake filling, which can be customized in numerous ways. Traditional cheesecakes are rich and creamy, typically made with cream cheese, sugar, eggs, and sometimes sour cream, which contributes to the smooth texture and tangy flavor. This particular recipe embraces the classic style while adding a fruity twist that elevates it to something truly special.
The base of any cheesecake is its crust, and this recipe utilizes a graham cracker crust to provide a delightful crunch that contrasts beautifully with the creamy filling. The graham cracker crust is a quintessential component of many cheesecake recipes, offering a sweet and slightly nutty flavor profile that complements the rich filling. Made from crushed graham crackers, sugar, and butter, this crust is easy to prepare and sets the stage for the layers to come.
Next, we move on to the star of the show—the strawberry layer. Fresh strawberries not only add vibrant color but also contribute a burst of natural sweetness and acidity that balances the richness of the cheesecake layer. This combination of flavors creates a harmonious blend that is sure to impress anyone who takes a bite.
Ingredients Breakdown
To create the Strawberry Dream Cheesecake Icebox Bars, you will need a few key ingredients that work together to create the perfect layered dessert. Here’s a detailed breakdown of each component:
For the Crust:
– Graham Crackers: The foundation of our crust, graham crackers provide a sweet and aromatic base. When crushed, they easily combine with butter and sugar to create a sturdy, flavorful crust.
– Sugar: A little bit of granulated sugar sweetens the crust and enhances the overall flavor profile.
– Unsalted Butter: Using unsalted butter in the crust is essential as it allows for better control over the overall saltiness of the dessert. The richness of the butter also contributes to the decadent texture of the crust.
For the Cheesecake Layer:
– Cream Cheese: The star ingredient in any cheesecake, cream cheese gives the filling its signature creamy texture and rich flavor. For the best results, make sure to use full-fat cream cheese, as it provides a smoother consistency.
– Powdered Sugar: This is used instead of granulated sugar for a silkier texture in the cheesecake layer. Powdered sugar dissolves easily and ensures that the final filling is smooth and lump-free.
– Vanilla Extract: A splash of pure vanilla extract adds depth and enhances the overall flavor of the cheesecake, making it taste even more indulgent.
For the Strawberry Layer:
– Fresh Strawberries: The highlight of this dessert, fresh strawberries not only add a pop of color but also infuse the cheesecake with their natural sweetness and tartness. It’s essential to use ripe, juicy strawberries for the best flavor.
– Gelatin: A small amount of gelatin helps to stabilize the strawberry layer, ensuring it holds its shape when cut into bars. This is especially important for a no-bake dessert.
– Lemon Juice: Just a squeeze of fresh lemon juice brightens the strawberry flavor, enhancing its natural sweetness and providing a pleasant acidity.
For Garnish:
– Whipped Cream: A dollop of freshly whipped cream on top of each bar adds an extra touch of luxury and creaminess, making this dessert truly irresistible.
– Whole Strawberries: For a beautiful presentation, whole strawberries can be used as a garnish, showcasing the freshness of the fruit and inviting everyone to dig in.
Using fresh, high-quality ingredients is crucial for achieving the best flavor and texture in your Strawberry Dream Cheesecake Icebox Bars. The use of unsalted butter allows the other flavors to shine without being overshadowed by saltiness, while fresh strawberries ensure that your dessert tastes vibrant and seasonal.
Step-by-Step Instructions for Preparation
Now that we have a good understanding of the ingredients, let’s dive into the preparation process. Creating these Strawberry Dream Cheesecake Icebox Bars involves a few straightforward steps that make the recipe accessible to home bakers of all skill levels.
Preparing the Crust
1. Crush the Graham Crackers: Start by placing the graham crackers in a food processor and pulse them into fine crumbs. If you don’t have a food processor, you can also place the crackers in a zip-top bag and crush them with a rolling pin.
2. Combine Ingredients: In a mixing bowl, combine the graham cracker crumbs, granulated sugar, and melted unsalted butter. Stir until the mixture is well combined and resembles wet sand.
3. Press into the Pan: Line an 8×8-inch baking dish with parchment paper for easy removal later. Pour the graham cracker mixture into the prepared dish and press it down firmly into an even layer. Make sure to pack it tightly to create a sturdy base.
4. Chill the Crust: Place the crust in the refrigerator for at least 30 minutes. Chilling the crust is crucial; it helps it firm up and ensures that it holds its shape when you add the cheesecake layer on top.
Crafting the Cheesecake Layer
1. Prepare the Cream Cheese: While the crust is chilling, take the cream cheese out of the refrigerator and allow it to come to room temperature. This will make it easier to beat until smooth.
2. Mix the Cheesecake Filling: In a large mixing bowl, beat the softened cream cheese with an electric mixer until creamy and smooth. Gradually add the powdered sugar and continue to mix until fully incorporated. Finally, add the vanilla extract and mix until combined.
3. Spread the Filling: Once the filling is smooth, carefully spread it over the chilled graham cracker crust, ensuring an even layer. Use a spatula to smooth the top for a polished finish.
4. Chill Again: Return the dish to the refrigerator to let the cheesecake layer set for about 1 to 2 hours. This step is important for achieving the right texture before adding the strawberry layer.
By following these initial steps, you’re well on your way to creating the Strawberry Dream Cheesecake Icebox Bars. The combination of textures and flavors is sure to impress, making this dessert a memorable addition to any occasion. Stay tuned for the next part, where we will delve into crafting the strawberry layer and garnishing these delightful bars.
{{image_2}}
Creating the perfect Strawberry Dream Cheesecake Icebox Bars requires attention to detail, especially when it comes to the cream cheese mixture and the strawberry layer. In this section, we will cover essential techniques for achieving a smooth and creamy cheesecake filling, the process for preparing the strawberry layer, and tips for assembling and serving these delightful bars.
Techniques for Achieving a Smooth Cream Cheese Mixture
The foundation of any cheesecake is a smooth cream cheese mixture. Here are a few techniques to ensure your cheesecake filling is lump-free and velvety:
1. Room Temperature Ingredients: Begin by allowing your cream cheese to come to room temperature. Cold cream cheese can lead to lumps in your mixture. Set it out for about 30 minutes before you start mixing.
2. Mixing Method: Use an electric mixer on medium speed. Start mixing the softened cream cheese alone to break it down before adding any sugar or other ingredients. This helps to create a uniform texture.
3. Gradual Incorporation: Add sugar gradually while mixing, and then incorporate the other ingredients, such as vanilla extract and lemon juice. This step is crucial as it prevents the cream cheese from clumping together.
4. Scrape the Bowl: Don’t forget to stop the mixer and scrape down the sides and bottom of the mixing bowl periodically. This ensures all the ingredients are thoroughly combined.
Explanation of the Folding Technique to Maintain Whipped Cream’s Volume
After achieving a smooth cream cheese mixture, the next step is to fold in the whipped cream. The folding technique is essential to maintain the lightness of the whipped cream, which adds an airy texture to your cheesecake bars:
1. Whip the Cream: Start with cold heavy cream and whip it until soft peaks form. Be careful not to over-whip, as this can lead to a grainy texture.
2. Folding Method: Use a rubber spatula to gently lift the cream from the bottom of the bowl and fold it over the cream cheese mixture. Rotate the bowl as you fold to ensure even mixing without deflating the whipped cream.
3. Gentle Motion: Continue to fold until just combined. It’s okay if there are a few streaks of whipped cream visible; complete blending can lead to a denser filling.
Preparing the Strawberry Layer
The strawberry layer adds a burst of flavor and color to your icebox bars. Here’s how to prepare it:
1. Cooking the Strawberries: Start by washing and hulling fresh strawberries. In a saucepan, combine the strawberries with a bit of sugar and lemon juice. Cook over medium heat until the strawberries begin to release their juices and soften, about 5-7 minutes.
2. Enhancing Flavor: Cooking the strawberries intensifies their flavor and creates a more robust filling. Stir occasionally and mash some of the berries with a fork to create a chunky sauce.
3. Thickening with Cornstarch: In a small bowl, mix cornstarch with a tablespoon of water to create a slurry. Add this to the strawberry mixture while it simmers. Stir continuously until the mixture thickens, which should take about 2-3 minutes. Remove from heat and let it cool completely before layering.
Assembling the Icebox Bars
Assembling the layers of your Strawberry Dream Cheesecake Icebox Bars is crucial for their final appearance and texture. Follow these tips for effective layering:
1. First Layer: Spread half of the cream cheese mixture evenly over the prepared crust. Use an offset spatula for a smooth finish.
2. Strawberry Layer: Once the strawberry mixture has cooled to room temperature, pour it over the cream cheese layer. Use the spatula to spread it evenly, ensuring it reaches all corners.
3. Final Layer: Gently spread the remaining cream cheese mixture on top of the strawberry layer. Smooth it out to create a flat surface.
4. Chilling Time: Cover the pan with plastic wrap and refrigerate for at least 4 hours, or overnight if possible. Proper chilling is important as it allows the bars to set and enhances the flavors.
Serving Suggestions
When it comes time to serve your delicious Strawberry Dream Cheesecake Icebox Bars, presentation and pairing can elevate the experience. Here are some ideas:
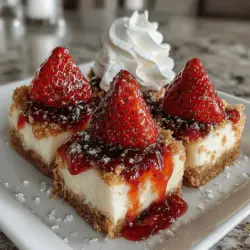
1. Garnishing: Before serving, consider garnishing each bar with a dollop of whipped cream and fresh strawberries on top. A light dusting of powdered sugar adds a touch of elegance.
2. Beverage Pairings: These bars pair wonderfully with a variety of beverages. For a refreshing touch, serve with iced tea or lemonade. For a more indulgent experience, consider pairing with a glass of dessert wine or a rich coffee.
3. Occasion Ideas: These icebox bars are perfect for warm weather gatherings, picnics, or birthday parties. Their creamy texture and fruity flavor make them a crowd-pleaser.
Nutritional Information and Serving Size
Understanding the nutritional value of your dessert is helpful for mindful enjoyment:
– Serving Size: The recipe typically yields around 12 bars, depending on how you cut them.
– Nutritional Overview: Each bar contains an approximate breakdown of calories, fat, carbohydrates, and sugars. It’s important to check these values based on the specific ingredients you use.
– Moderation: While these bars are a delightful treat, moderation is key. Enjoying them as part of a balanced diet allows you to savor the flavors without overindulgence.
Conclusion
Strawberry Dream Cheesecake Icebox Bars are a delightful dessert that combines the rich creaminess of cheesecake with the fresh, fruity essence of strawberries. The layering process, combined with the right techniques for achieving a smooth filling, results in a dessert that is not only visually appealing but also deliciously satisfying.
We encourage you to try making this refreshing dessert for yourself. Whether it’s a warm summer day or a special occasion, these icebox bars are sure to impress your family and friends. Enjoy the joy of sharing homemade treats, and let the delightful flavors of strawberry and cheesecake bring smiles to everyone’s faces.