Introduction
Sweet Maple Glazed Donut Holes are a delightful treat that brings a taste of nostalgia and comfort to any occasion. Soft, fluffy, and coated in a luscious maple glaze, these donut holes are perfect for breakfast, snack time, or dessert. Whether served at a brunch gathering or enjoyed with a cup of coffee, they will surely satisfy your sweet cravings and leave you wanting more.
The history of donut holes dates back to the 19th century, coinciding with the rise of the doughnut itself. While the origins are somewhat debated, it is widely accepted that the concept of frying sweet dough in oil emerged in various cultures across the globe. The introduction of the donut hole, a clever way to use the dough that would otherwise be discarded, allowed for a bite-sized version of the beloved treat. The combination of maple syrup and donuts is particularly popular in North America, where the warm, comforting flavor of maple evokes feelings of home and tradition.
Sweet Maple Glazed Donut Holes have become a beloved comfort food for many, thanks to their warm, sweet flavor and easy-to-eat shape. The donut holes are not only simple to make but also allow for creativity in the kitchen, as they can be customized with various glazes or fillings. The promise of a detailed recipe and cooking tips will guide you through creating these delightful morsels in your own kitchen.
Understanding the Ingredients
To make the perfect Sweet Maple Glazed Donut Holes, it’s essential to understand the key ingredients that contribute to their deliciousness.
Essential Ingredients
1. Flour: All-purpose flour is the base of the donut dough, providing structure and texture. For a lighter donut, consider using cake flour, which has a lower protein content.
2. Sugar: Granulated sugar sweetens the dough and helps achieve a golden color when fried. Brown sugar can also be used for a richer flavor.
3. Baking Powder: This leavening agent is crucial for creating a light, fluffy texture. It helps the donut holes rise as they cook.
4. Milk: Whole milk adds moisture to the dough and contributes to a tender crumb. For a dairy-free option, almond or oat milk can be used.
5. Eggs: Eggs bring richness to the dough and help bind the ingredients together. They also contribute to the overall texture.
6. Maple Syrup: The star of the show, pure maple syrup, is used in both the dough and the glaze, providing that signature sweet and earthy flavor.
7. Vegetable Oil: Used for frying, vegetable oil has a high smoke point, making it ideal for achieving a crispy exterior on the donut holes.
Choosing the Right Flour
When selecting flour for your Sweet Maple Glazed Donut Holes, it’s crucial to use a high-quality all-purpose flour. This will ensure the right balance of structure and tenderness in your donuts. If you prefer a lighter texture, you might opt for cake flour, which will result in a more delicate donut hole.
The Role of Sugar
Sugar not only sweetens the dough but also plays a significant role in the browning process during frying. The caramelization of sugar contributes to the donut holes’ appealing golden exterior. Brown sugar can be substituted for granulated sugar if you desire a deeper flavor profile.
The Importance of Baking Powder
Baking powder is a vital ingredient in this recipe, as it provides the lift necessary for fluffy donut holes. Be sure to check the expiration date on your baking powder, as old leavening agents can impact the donut holes’ rise and texture.
Milk: A Moisture Booster
Whole milk is ideal for this recipe, as its fat content contributes to a rich, moist dough. However, if you are looking for a lighter alternative, consider using low-fat milk or a dairy-free option like almond or soy milk.
The Sweetness of Maple Syrup
Using pure maple syrup is essential for achieving the authentic flavor that makes these donut holes special. Avoid imitation maple syrups, as they often contain artificial flavors that do not provide the same depth of taste. The syrup is used both in the dough and the glaze, ensuring a consistent flavor throughout.
Preparation Steps
Now that we’ve covered the essential ingredients, it’s time to dive into the preparation steps for your Sweet Maple Glazed Donut Holes. Following these steps will ensure that your donuts come out perfectly every time.
Prepping the Dough
1. Mixing the Dry Ingredients: In a large mixing bowl, combine the all-purpose flour, granulated sugar, baking powder, and a pinch of salt. Whisk these dry ingredients together until well combined.
2. Combining the Wet Ingredients: In a separate bowl, whisk together the milk, eggs, and pure maple syrup. Ensure that the eggs are well beaten before adding them to the mixture.
3. Creating the Dough: Pour the wet ingredients into the bowl with the dry ingredients. Stir gently until a soft dough begins to form. Avoid overmixing, as this can lead to tough donut holes.
Shaping the Donut Holes
1. Flouring Your Surface: Lightly flour a clean surface to prevent sticking. Transfer the dough onto the floured surface.
2. Rolling the Dough: Use a rolling pin to roll the dough out to about half an inch thick. Ensure that the dough is evenly rolled to promote even cooking.
3. Cutting the Donut Holes: Using a small round cutter, cut out circles from the dough, pressing firmly but gently to avoid tearing. You can also use your hands to pinch off small pieces of dough and roll them into balls if you prefer a rustic look.
Preparing the Oil for Frying
1. Choosing the Right Pot: Select a deep heavy-bottomed pot or a deep fryer for frying. This will help maintain an even temperature and prevent oil splatter.
2. Heating the Oil: Fill the pot with vegetable oil, ensuring it’s deep enough to fully submerge the donut holes. Heat the oil over medium heat until it reaches a temperature of 350°F (175°C). You can use a candy thermometer to monitor the temperature accurately.
Frying the Donut Holes
1. Frying in Batches: Carefully drop a few donut holes into the hot oil, being mindful not to overcrowd the pot. Fry them until they are golden brown on all sides, about 2-3 minutes per batch.
2. Draining the Oil: Use a slotted spoon to remove the donut holes from the oil and transfer them to a plate lined with paper towels to absorb any excess oil.
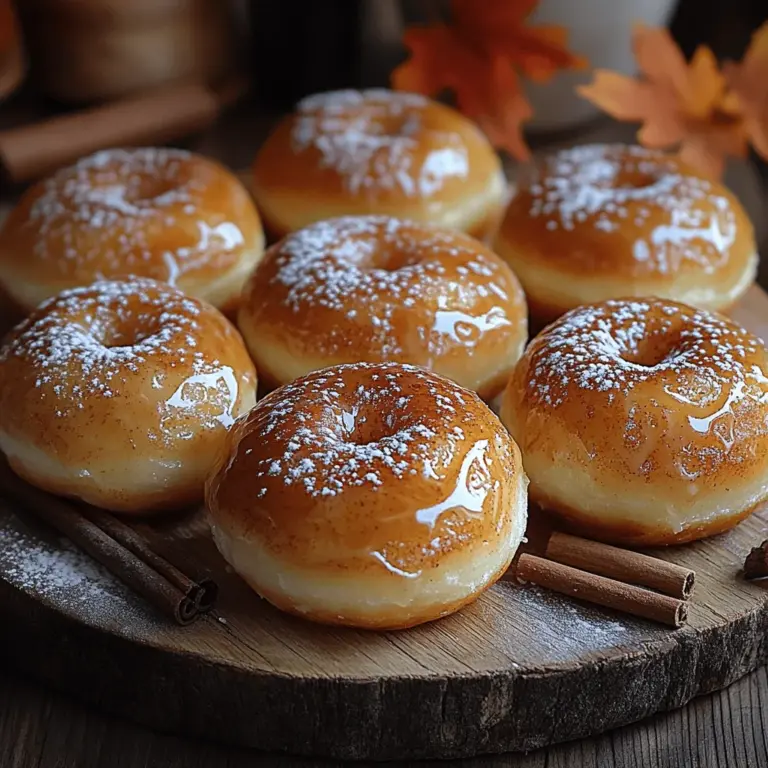
Making the Maple Glaze
While the donut holes are cooling, it’s time to prepare the sweet maple glaze that will give them their delicious finish.
1. Combining Ingredients: In a small mixing bowl, combine powdered sugar, maple syrup, and a splash of milk. Whisk until smooth and well combined. The glaze should be thick but pourable.
2. Dipping the Donut Holes: Once the donut holes have cooled slightly, dip each one into the maple glaze, ensuring they are well-coated. Allow the excess glaze to drip off before placing them on a wire rack to set.
3. Adding a Finishing Touch: For extra flavor, consider sprinkling a pinch of sea salt on top of the glazed donut holes, which will beautifully contrast with the sweetness of the maple.
These Sweet Maple Glazed Donut Holes are now ready to be enjoyed! Their fluffy texture, combined with the rich maple flavor, makes for an irresistible treat that will delight friends and family alike. In the next part of this article, we will delve into cooking techniques and tips to ensure your donut holes turn out perfectly every time.
{{image_2}}
Sautéing the Vegetables
Sautéing vegetables is a crucial step in achieving the rich flavors that define Beef Stroganoff. When preparing this classic dish, the order and timing of adding the vegetables can significantly impact the final taste and texture.
Timing for Adding Onions and Mushrooms
Begin by heating a tablespoon of oil or butter in a large skillet over medium heat. Once the oil is shimmering, add finely chopped onions. Sauté the onions for about 3-4 minutes until they become translucent. This initial step allows the onions to release their sweetness, forming a flavorful base for the dish.
After the onions soften, it’s time to add the mushrooms. Use approximately 8 ounces of sliced mushrooms for a balanced ratio and a hearty texture. Sauté the mushrooms with the onions for an additional 5-7 minutes. This timing ensures that the mushrooms are nicely browned, bringing out their umami flavor while also cooking off excess moisture, which could make the dish watery.
Tips for Ensuring Vegetables are Tender Yet Flavorful
To achieve tender yet flavorful vegetables, consider the following tips:
– Use Fresh Ingredients: Fresh onions and mushrooms will yield better flavor and texture than older or pre-packaged varieties.
– Avoid Overcrowding the Pan: If your skillet is too crowded, the vegetables will steam instead of sauté. Cook in batches if necessary to maintain that delicious caramelization.
– Season as You Go: Add a pinch of salt while sautéing the vegetables. This enhances their natural flavors and helps draw out moisture, allowing for a better browning effect.
Combining Ingredients
With your vegetables sautéed to perfection, it’s time to combine them with the beef and sauce. This step is essential for integrating all the flavors and ensuring every bite of your Beef Stroganoff is rich and satisfying.
Steps to Integrate Beef and Sauce for Optimal Flavor
1. Add the Cooked Beef: Once the mushrooms and onions are ready, push them to the side of the skillet and add the pre-cooked beef strips. Sear the beef for about 2-3 minutes over high heat, ensuring a bit of caramelization on the edges.
2. Incorporate the Sauce: In a separate bowl, combine 1 cup of beef broth, 1 tablespoon of Worcestershire sauce, and 1 tablespoon of Dijon mustard. Pour this mixture over the beef and vegetables in the skillet. Stir well to combine, ensuring that all the ingredients are coated in the sauce.
3. Simmer for Flavor: Reduce the heat to low and let the mixture simmer for about 5-10 minutes. This allows the flavors to meld together beautifully, creating a cohesive and flavorful sauce.
Techniques for Incorporating Sour Cream Without Curdling
Sour cream is the finishing touch that adds creaminess and tang to your Beef Stroganoff. To prevent curdling, follow these essential techniques:
– Temper the Sour Cream: Before adding sour cream directly to the hot skillet, take a small amount of the sauce from the skillet and whisk it into the sour cream in a separate bowl. This gradually raises the temperature of the sour cream, reducing the risk of curdling when added back to the hot mixture.
– Add Off the Heat: Once the sour cream is tempered, remove the skillet from heat before stirring it in. This will prevent any sudden temperature changes that could cause the sour cream to curdle.
Serving Suggestions
Beef Stroganoff is a versatile dish that pairs beautifully with various accompaniments. Here are some traditional and creative serving suggestions to elevate your meal.
Traditional Accompaniments
The classic way to serve Beef Stroganoff is over a bed of egg noodles, rice, or mashed potatoes. These starchy bases complement the rich sauce and absorb its flavors.
– Noodles: Egg noodles are the traditional choice. Cook them al dente according to package instructions, then drain and toss them with a bit of butter to prevent sticking. For a twist, consider using wide pappardelle or even whole wheat noodles for added texture and nutrition.
– Rice and Potatoes: If you prefer rice, jasmine or basmati rice works well, providing a fragrant base. For a heartier option, creamy mashed potatoes make a delightful pairing. Alternatively, try roasted or steamed potatoes seasoned with herbs to offer a different flavor profile.
Garnishing for Presentation
Garnishes not only add visual appeal but also enhance the dish’s flavor. Consider these options:
– Fresh Herbs: Chopped parsley or dill sprinkled on top of your Beef Stroganoff adds a pop of freshness. Just before serving, add the herbs to maintain their vibrant color and flavor.
– Sour Cream Drizzle: A dollop of sour cream on top provides a beautiful contrast to the rich sauce and a hint of tanginess.
Serving Suggestions for a Complete Meal
To create a well-rounded meal, consider serving your Beef Stroganoff with additional side dishes. A simple side salad with mixed greens, cherry tomatoes, and a light vinaigrette can balance the richness of the Stroganoff. Additionally, roasted vegetables or steamed green beans can add color and nutrients to your plate, making for a satisfying dining experience.
Variations of Beef Stroganoff
While the classic Beef Stroganoff recipe is beloved by many, there are numerous variations that cater to different tastes and dietary needs.
Classic vs. Modern Interpretations
The traditional version of Beef Stroganoff features tender beef strips and a creamy sauce, while modern takes may incorporate different proteins like chicken or turkey. For a quicker preparation, some recipes utilize pre-cooked meats or even ground beef for a simpler approach.
Healthier Variations Using Leaner Meats or Plant-Based Options
For those seeking lighter options, consider using leaner cuts of beef such as sirloin or tenderloin. Alternatively, plant-based versions can be made with mushrooms, lentils, or textured vegetable protein (TVP) for a meat-free experience that still embraces the essence of the dish.
Global Influences and Adaptations
Global variations of Beef Stroganoff can introduce exciting flavors. For example, adding soy sauce and ginger creates an Asian-inspired twist, while incorporating curry powder can offer an Indian flair. Each adaptation showcases the versatility of this dish.
Dietary Restrictions and How to Accommodate Them
When accommodating dietary restrictions, there are several easy modifications you can make:
– Gluten-Free Adaptations: Substitute all-purpose flour with cornstarch to thicken the sauce. Ensure that the beef broth and noodles are gluten-free as well.
– Dairy-Free Options: Replace sour cream with a dairy-free alternative like coconut cream or cashew cream, blended until smooth.
Storing and Reheating Beef Stroganoff
Proper storage and reheating methods are essential for maintaining the quality of your Beef Stroganoff leftovers.
Best Practices for Storing Leftovers
Allow the Beef Stroganoff to cool to room temperature before transferring it to an airtight container. It can be stored in the refrigerator for up to 3 days or frozen for up to 3 months. For freezing, consider portioning the Stroganoff into individual servings for easy reheating.
Recommended Methods for Reheating
Reheating Beef Stroganoff should be done gently to preserve its creamy texture. For the best results:
– Microwave: Place the Stroganoff in a microwave-safe dish, cover it loosely with a lid or microwave-safe wrap, and heat in 30-second intervals, stirring in between until heated through.
– Stovetop: Reheat in a skillet over low heat, adding a splash of beef broth or water to loosen the sauce and prevent it from thickening too much.
Avoiding Common Pitfalls That Ruin Texture
When reheating, avoid high heat, which can cause the sour cream to curdle and the beef to become tough. Stirring frequently and adding moisture will help maintain the dish’s creamy consistency.
Pairing Wine with Beef Stroganoff
Selecting the right wine can enhance your Beef Stroganoff experience, complementing the flavors of the dish beautifully.
Recommended Wine Pairings
When pairing wine with Beef Stroganoff, consider the dish’s richness and flavors:
– Red Wines: A medium-bodied red wine, such as Merlot or Pinot Noir, complements the beef’s hearty flavors without overpowering the dish. The fruity notes can enhance the umami of the mushrooms.
– White Wine Options: For a lighter taste, a dry white wine like Chardonnay can work well. Its acidity helps cut through the creaminess of the sauce, creating a balanced pairing.
Conclusion
Beef Stroganoff is a timeless dish that brings warmth and comfort to any meal. With its creamy sauce, tender beef, and perfectly sautéed vegetables, it’s no wonder this recipe has secured a place in many hearts and homes. The joy of cooking and sharing this dish with loved ones is truly special, as it brings people together around the table.
As you explore this recipe and its variations, consider making it a family favorite. Whether you stick to the classic method or try a modern take, Beef Stroganoff is sure to delight with every comforting bite. So gather your ingredients, follow the steps, and enjoy a meal that’s rich in flavor and tradition.
