Introduction
There’s something undeniably captivating about chocolate desserts. Whether it’s the rich, velvety texture or the intense, indulgent flavor, chocolate has a way of captivating our taste buds and elevating our spirits. Among the myriad of chocolate treats available, cheesecake stands out as a beloved classic. Its creamy richness paired with a crisp crust makes it a dessert that is not only satisfying but also versatile enough to cater to various palates.
When it comes to chocolate cheesecake, combining the luxurious flavor of Godiva chocolate takes this dessert to new heights. Godiva is renowned for its premium chocolate, crafted from the finest cocoa beans, which results in a depth of flavor that is simply unmatched. This decadent Godiva chocolate cheesecake will not only impress your guests but will also become a cherished favorite in your dessert repertoire.
In this blog post, we will guide you through the process of creating this indulgent dessert from scratch. From understanding the essential ingredients to crafting the perfect crust and filling, we will ensure that you have all the tools necessary for a successful baking experience. So, prepare yourself for a delightful journey into the world of chocolate cheesecake!
Understanding the Ingredients
Before we dive into the baking process, it’s essential to familiarize ourselves with the key ingredients that make this Godiva chocolate cheesecake truly decadent. Here’s a breakdown of what you’ll need:
1. Cream Cheese: The base of any cheesecake, cream cheese provides the rich and creamy texture that is characteristic of this dessert. Be sure to use full-fat cream cheese for optimal flavor and consistency.
2. Granulated Sugar: Sugar not only sweetens the cheesecake but also contributes to its smooth texture. It helps to balance the richness of the cream cheese and chocolate.
3. Eggs: Eggs are crucial in cheesecake recipes as they help to bind the ingredients together and provide a silky texture. They also aid in the setting of the cheesecake once baked.
4. Sour Cream: Adding sour cream brings a tangy flavor that contrasts beautifully with the sweetness of the chocolate, enhancing the overall taste profile. It also contributes to the creaminess of the cheesecake.
5. Godiva Chocolate: The star ingredient of our recipe, Godiva chocolate, is what elevates this cheesecake into a luxurious treat. Its rich flavor and smooth texture are essential for achieving that decadent chocolate experience.
6. Cocoa Powder: Unsweetened cocoa powder intensifies the chocolate flavor and adds depth to the filling, ensuring that every bite is packed with chocolate goodness.
7. Chocolate Graham Crackers: For the crust, chocolate graham crackers add a delightful flavor that complements the filling while providing a sturdy base.
8. Butter: Melted butter is used to bind the graham cracker crumbs together, creating a cohesive crust that holds up to the creamy filling.
9. Vanilla Extract: A splash of vanilla extract enhances the overall flavor of the cheesecake, adding a subtle warmth that complements the chocolate.
Using high-quality ingredients, particularly Godiva chocolate, is crucial for achieving a cheesecake that is not just good, but truly exceptional. Each component plays a significant role in the flavor and texture of the final dessert, so be mindful of your choices when gathering ingredients.
Creating the Perfect Crust
Now that you have a clear understanding of the essential ingredients, let’s move on to crafting the crust, which is a vital element of your cheesecake. A well-prepared crust not only adds flavor but also provides the necessary structure to support the rich filling.
Ingredients for the Crust
– 1 ½ cups chocolate graham cracker crumbs
– ½ cup granulated sugar
– ½ cup unsalted butter, melted
– A pinch of salt
Instructions
1. Preheat the Oven: Begin by preheating your oven to 325°F (163°C). This temperature ensures that the crust bakes evenly without becoming overly hard.
2. Prepare the Graham Cracker Crumbs: If you don’t have pre-made chocolate graham cracker crumbs, you can easily make your own. Simply place several chocolate graham crackers in a food processor and pulse them until they reach a fine crumb consistency.
3. Mix the Crust Ingredients: In a medium-sized mixing bowl, combine the chocolate graham cracker crumbs, granulated sugar, melted butter, and a pinch of salt. Mix until the crumbs are well-coated in the butter and the mixture resembles wet sand.
4. Press into the Pan: Grease a 9-inch springform pan with a little butter or cooking spray to prevent sticking. Pour the crumb mixture into the pan, spreading it evenly across the bottom and up the sides. Use the back of a measuring cup or your fingers to firmly press the crumbs down, ensuring that they form a solid layer.
5. Bake the Crust: Place the crust in the preheated oven and bake for about 10 minutes. This step helps to set the crust and enhances its flavor. Once baked, remove the crust from the oven and allow it to cool while you prepare the filling.
Tips for the Perfect Crust
– Don’t Skimp on Pressing: Ensure that the crumbs are tightly packed to avoid a crumbly crust. A well-pressed crust will hold together better when slicing the cheesecake.
– Cooling the Crust: Allow the crust to cool completely before adding the filling. This prevents the cheesecake batter from melting the crust and maintains its structure.
– Experiment with Flavors: While chocolate graham crackers are fantastic, feel free to experiment with other cookie types, such as Oreos or vanilla wafers, for unique flavor profiles.
The crust is the foundation of your cheesecake, setting the stage for the creamy filling that is to come. Taking the time to prepare it correctly will ensure that your cheesecake is a delightful combination of textures and flavors.
Crafting the Chocolate Cheesecake Filling
With the crust ready and cooled, we can now turn our attention to crafting the chocolate cheesecake filling. This step is crucial for achieving a smooth, creamy texture that melts in your mouth while delivering a rich chocolate flavor.
Ingredients for the Filling
– 24 ounces cream cheese, softened
– 1 cup granulated sugar
– 1 teaspoon vanilla extract
– 3 large eggs, at room temperature
– 1 cup sour cream
– 8 ounces Godiva chocolate, melted and slightly cooled
– ¼ cup unsweetened cocoa powder
Instructions
1. Prepare the Cream Cheese: In a large mixing bowl, beat the softened cream cheese with an electric mixer on medium speed until it’s smooth and creamy. This step is essential for avoiding lumps in your cheesecake batter.
2. Add the Sugar and Vanilla: Gradually add the granulated sugar and vanilla extract to the cream cheese, continuing to mix until fully incorporated.
3. Incorporate the Eggs: Add the eggs one at a time, mixing on low speed after each addition until just combined. Be careful not to overmix, as this can incorporate too much air into the batter, leading to cracks during baking.
4. Blend in the Sour Cream: Gently fold in the sour cream until the mixture is smooth. The sour cream adds a delightful tanginess that balances the sweetness of the chocolate.
5. Melt the Godiva Chocolate: In a microwave-safe bowl, melt the Godiva chocolate in 30-second intervals, stirring in between, until completely melted and smooth. Allow the chocolate to cool slightly before adding it to the batter to avoid cooking the eggs.
6. Combine the Chocolate and Cocoa Powder: Add the melted chocolate and unsweetened cocoa powder to the cream cheese mixture, mixing until fully combined. This step is crucial for ensuring that the chocolate flavor is evenly distributed throughout the batter.
Techniques for Achieving Smooth Consistency
– Room Temperature Ingredients: Ensuring that your cream cheese, eggs, and sour cream are at room temperature allows for easier blending and a smoother texture.
– Careful Mixing: Mix on low speed when incorporating eggs and other ingredients to avoid over-aerating the batter, which can lead to cracks during baking.
– Straining the Batter: For an ultra-smooth filling, you can strain the batter through a fine-mesh sieve to remove any lumps before pouring it into the crust.
Crafting the filling for your Godiva chocolate cheesecake is an art form that requires careful attention to detail. By following these steps and techniques, you can achieve a rich and creamy filling that complements the crust beautifully.
Incorporating Rich Chocolate Flavor
The final step in preparing your chocolate cheesecake filling is to ensure that the rich flavor of the Godiva chocolate is fully realized. The combination of melted Godiva chocolate and cocoa powder works together to create a chocolate experience that is nothing short of heavenly.
Tips for Even Distribution of Chocolate Flavor
– Melted Chocolate Temperature: Make sure the melted Godiva chocolate is not too hot when you add it to the batter, as this can cause the eggs to cook and create an undesirable texture. Allow it to cool slightly before mixing.
– Gradual Incorporation: When adding the melted chocolate to the cream cheese mixture, do so gradually while mixing on low speed. This method helps to evenly distribute the chocolate without creating lumps.
– Tasting and Adjusting: Don’t hesitate to taste the batter before baking! If you desire a more intense chocolate flavor, consider adding a bit more melted chocolate or cocoa powder, keeping in mind that this may affect the overall texture.
By meticulously incorporating the Godiva chocolate and cocoa powder, you ensure that each slice of cheesecake is a decadent, chocolatey delight.
In this first part of our decadent Godiva chocolate cheesecake recipe, we’ve covered the essential introduction to the dessert, the importance of quality ingredients, creating a perfect crust, and crafting a smooth chocolate filling. Stay tuned for the next installment, where we will explore the baking and cooling processes, as well as provide tips to ensure your cheesecake turns out flawlessly every time. Get ready to indulge in a dessert experience like no other!
{{image_2}}
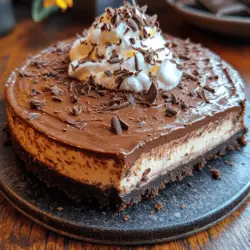
The Balance of Sweetness and Richness in the Cheesecake
Creating a decadent Godiva chocolate cheesecake is not just about combining ingredients; it’s an art that brings together the perfect balance of sweetness and richness. This luxurious dessert envelops the palate with a creamy texture and deep chocolate flavor, making it an irresistible treat for any occasion. The key lies in using high-quality chocolate and carefully measuring the sugar to ensure that neither overwhelms the other. The result is a cheesecake that is indulgent yet not overly sweet, allowing the rich chocolate notes to shine through.
Baking the Cheesecake to Perfection
Achieving the perfect cheesecake requires attention to detail, particularly when it comes to baking. The following guidelines will help you avoid cracks and ensure a silky texture.
Guidelines for Baking the Cheesecake
1. Prepare Your Springform Pan: Ensure your springform pan is well-greased, and consider lining the bottom with parchment paper. This not only helps with easy removal but also prevents sticking.
2. Water Bath Method: For a creamy texture, bake your cheesecake in a water bath. Wrap the outside of the springform pan in aluminum foil to prevent water from seeping in. Place the pan in a larger baking dish containing hot water that reaches halfway up the sides of the springform pan. This method provides gentle, even heat, which helps prevent cracks.
3. Temperature Control: Bake your cheesecake at a low temperature, typically around 325°F (163°C). This slow cooking allows the cheesecake to set without becoming rubbery.
Explanation of the Cooling Process in the Oven
Once the baking time is complete, turn off the oven and crack the door open. Allowing the cheesecake to cool gradually in the oven helps prevent sudden temperature changes that can cause cracks. Let it sit for about an hour before transferring it to the countertop to cool completely. This method also allows moisture to escape slowly, contributing to a smoother texture.
Signs to Look for to Determine Perfect Doneness of the Cheesecake
To check if your cheesecake is done, gently shake the pan. The center should jiggle slightly but not appear liquid. It will continue to set as it cools. Additionally, the edges should look firm and slightly puffed, while the center remains a bit lower than the edges. If you see cracks forming, it’s likely overcooked, so take care to monitor the baking process closely.
Making the Decadent Ganache Topping
Once your cheesecake has cooled, it’s time to prepare the rich ganache that will take your dessert to the next level.
Step-by-Step Instructions for Preparing the Chocolate Ganache
1. Ingredients Needed: Gather 8 ounces of high-quality Godiva chocolate (or any preferred chocolate) and 1 cup of heavy cream.
2. Chop the Chocolate: Finely chop the chocolate and place it in a heatproof bowl. This ensures even melting.
3. Heat the Cream: In a small saucepan, heat the heavy cream over medium heat until it just begins to simmer. Do not let it boil.
4. Combine: Pour the hot cream over the chopped chocolate and let it sit for a few minutes. This allows the chocolate to soften.
5. Stir to Combine: After a few minutes, gently stir the mixture until smooth. If the chocolate isn’t fully melted, you can place it over a double boiler, stirring until completely smooth.
Importance of Timing and Temperature in Achieving a Smooth Ganache
Timing and temperature are crucial when making ganache. If the cream is too hot, it can seize the chocolate, resulting in a grainy texture. Conversely, if it cools too much before mixing, the ganache may not blend well. Aim for a balanced approach, ensuring your cream is steaming but not boiling, and allow the chocolate to melt gently.
Options for Varying the Ganache Flavor with Different Types of Chocolate
While Godiva chocolate provides a luxurious base, feel free to experiment with different types of chocolate. Dark chocolate will yield a richer, more intense ganache, while milk chocolate will create a sweeter topping. For a unique twist, consider adding a splash of flavored liqueurs, such as hazelnut or orange, to infuse additional layers of flavor.
Assembling and Setting the Cheesecake
With your cheesecake baked and your ganache prepared, it’s time to assemble this decadent dessert.
Instructions for Pouring and Spreading the Ganache Over the Cheesecake
Once the cheesecake is completely cooled:
1. Place the cheesecake on a serving plate or stand.
2. Pour the ganache over the center of the cheesecake, allowing it to flow naturally to the edges.
3. Use a spatula to gently spread the ganache evenly, ensuring it covers the surface completely.
Importance of Chilling Time for the Ganache and Overall Cheesecake to Set
After applying the ganache, it’s essential to chill the cheesecake for at least 4 hours, or overnight if possible. This chilling time allows the ganache to set properly, ensuring a firm yet creamy texture. The flavors also meld beautifully during this time, enhancing the overall taste experience.
Tips for Storing the Cheesecake to Maintain Freshness
To keep your cheesecake fresh, cover it loosely with plastic wrap or store it in an airtight container. It can be kept in the refrigerator for up to a week. If you want to preserve it for a longer period, consider freezing individual slices wrapped tightly in plastic wrap and aluminum foil. Thaw slices in the refrigerator before serving for the best texture.
Serving the Cheesecake
Presentation is key when serving this decadent dessert, as it not only enhances the experience but also makes it visually appealing.
Presentation Ideas to Enhance the Indulgent Experience
1. Garnishes: Consider garnishing the cheesecake with fresh berries, whipped cream, or chocolate shavings to add color and texture.
2. Drizzle: A drizzle of caramel sauce or additional melted chocolate around the plate can elevate the visual appeal.
3. Plating: Serve each slice on a decorative plate, and consider pairing it with a small scoop of vanilla ice cream for a delightful contrast.
Suggested Pairings That Complement the Cheesecake
To enhance the indulgent experience, pair your cheesecake with a rich espresso or a glass of dessert wine, such as Port or a sweet Riesling. For a non-alcoholic option, a creamy hot chocolate or a rich cup of coffee can provide a delightful balance to the cheesecake’s sweetness.
Celebrating Special Occasions with This Decadent Dessert
This Godiva chocolate cheesecake is perfect for celebrating special occasions, from birthdays to anniversaries or holiday gatherings. Its luxurious flavors and elegant presentation make it a standout dessert that will impress your guests and leave them craving more.
Conclusion
Making a decadent Godiva chocolate cheesecake is a rewarding experience that brings joy not only in the creation but also in sharing it with loved ones. The balance of rich chocolate and creamy texture creates an unforgettable dessert that is perfect for any celebration. Embrace the process of baking, enjoy the delightful results, and remember that this indulgent chocolate dessert will always hold a special place at gatherings and celebrations. Don’t hesitate to make this cheesecake your go-to recipe for impressing friends and family, and savor the satisfaction that comes from creating such a delightful treat.