Introduction
If you’re on the hunt for a dessert that perfectly marries the creamy richness of cheesecake with the nostalgic flavor of banana pudding, look no further than the Banana Pudding Crunch Cheesecake. This delightful treat offers a luscious combination of textures and flavors that will transport your taste buds back to childhood. With its layers of smooth cheesecake filling, sweet banana pudding, and a crunchy topping, this dessert is not just a feast for the eyes but a true indulgence for the palate.
The popularity of Banana Pudding Crunch Cheesecake has soared in recent years, and it’s easy to see why. Cheesecake lovers and banana pudding enthusiasts alike are drawn to its unique blend of classic flavors, making it a hit at gatherings, potlucks, and family dinners. Its visually appealing layers entice those who appreciate both taste and presentation, while the combination of creamy and crunchy elements ensures that every bite is a delightful surprise.
In this article, we will dive into the experience of crafting this decadent dessert, exploring the layers that contribute to its signature taste and texture. You’ll learn how to create a sturdy crust, a rich cheesecake filling, and a smooth banana pudding layer that will make your Banana Pudding Crunch Cheesecake a standout dessert at any occasion.
Understanding the Components of the Recipe
Before we get into the nitty-gritty of the recipe, it’s essential to understand the components that make up the Banana Pudding Crunch Cheesecake. Each layer plays a crucial role in contributing to the overall flavor and texture of the dessert.
1. The Crust: A solid foundation is key to any great cheesecake, and in this recipe, the crust is made from crushed graham cracker crumbs. The sweet, buttery flavor of the graham crackers provides a perfect contrast to the rich filling, while the crunchiness adds a delightful texture.
2. Cheesecake Filling: The heart of the dessert, this filling combines cream cheese, sugar, and sour cream to create a smooth and creamy base. The addition of ripe bananas infuses the cheesecake with natural sweetness and a hint of banana flavor, enhancing the overall taste.
3. Banana Pudding Layer: This layer adds a nostalgic touch to the cheesecake. Made with instant pudding mix and whole milk, the pudding is creamy and luscious, providing a perfect complement to the cheesecake filling. Bananas sliced and layered throughout this pudding add freshness and further enhance the banana flavor.
4. Topping: Finally, the dessert is crowned with a crunchy topping, often made from crushed cookies or additional graham cracker crumbs. This layer not only adds visual appeal but also provides a satisfying crunch that contrasts beautifully with the creamy layers beneath.
Using high-quality ingredients in each component is crucial for achieving the best results. Opt for full-fat cream cheese for the filling, ripe bananas for the freshest flavor, and premium pudding mix to ensure a delightful texture. By paying attention to ingredient quality, you’ll elevate your Banana Pudding Crunch Cheesecake to new heights.
Crafting the Perfect Crust
The crust is the backbone of your Banana Pudding Crunch Cheesecake, providing both structure and flavor. Here’s a step-by-step guide to creating a sturdy, flavorful base using graham cracker crumbs.
Overview of Crust Options
While graham cracker crumbs are a classic choice for cheesecake crusts, you can also experiment with other options like vanilla wafers or even chocolate cookies for a unique twist. However, for this recipe, we’ll focus on the traditional graham cracker crust that pairs beautifully with the banana and cheesecake flavors.
Step-by-Step Process to Create a Sturdy, Flavorful Base
1. Gather Your Ingredients: You’ll need about 1 and ½ cups of graham cracker crumbs, ½ cup of granulated sugar, and ½ cup of unsalted butter (melted).
2. Preheat the Oven: Preheat your oven to 350°F (175°C). This step is crucial as it ensures that your crust is baked properly.
3. Mix the Ingredients: In a medium-sized bowl, combine the graham cracker crumbs and granulated sugar. Pour in the melted butter and mix until the crumbs are evenly coated and the mixture resembles wet sand.
4. Press the Mixture: Transfer the crumb mixture into a 9-inch springform pan. Using the back of a measuring cup or your fingers, firmly press the crumbs into the bottom and up the sides of the pan, creating an even layer.
5. Bake the Crust: Place the springform pan in the preheated oven and bake for 8-10 minutes, or until the crust is golden and fragrant. This step helps to set the crust and enhances its flavor.
6. Cool: Once baked, remove the crust from the oven and let it cool completely before adding the cheesecake filling.
Tips for Achieving the Ideal Crust Texture
To achieve a perfectly textured crust, ensure that you press the graham cracker mixture firmly into the pan. This will help prevent it from crumbling when you slice into the cheesecake later. Additionally, using unsalted butter allows you to control the saltiness of the crust, which is important for balancing the sweetness of the filling.
If you prefer a thicker crust, feel free to increase the amount of graham cracker crumbs slightly, but be cautious not to make it overly thick, as it may overpower the delicate cheesecake layers.
Creating the Cheesecake Filling
Now that you have the perfect crust, it’s time to move on to the star of the show: the cheesecake filling. This layer is rich, creamy, and infused with the delightful flavor of bananas.
Importance of Using Room Temperature Cream Cheese
One of the key factors in achieving a smooth and creamy cheesecake filling is to use room temperature cream cheese. Cold cream cheese can lead to lumps in the filling, making it difficult to achieve the desired texture. To speed up the process, you can cut the cream cheese into small cubes and let it sit at room temperature for about 30 minutes before mixing.
Detailed Instructions for Mixing the Filling
1. Ingredients: Gather the following ingredients for your cheesecake filling:
– 16 oz (2 packages) of cream cheese, softened
– ¾ cup granulated sugar
– 1 teaspoon vanilla extract
– 2 large eggs
– ½ cup sour cream
– 2 ripe bananas, mashed
2. Mix the Cream Cheese and Sugar: In a large mixing bowl, beat the softened cream cheese with an electric mixer on medium speed until smooth and creamy. Gradually add the granulated sugar, mixing until well combined.
3. Add Vanilla and Eggs: Add the vanilla extract and mix until incorporated. Then, add the eggs one at a time, mixing on low speed after each addition just until blended. Be careful not to overmix, as this can incorporate excess air into the batter, leading to cracks during baking.
4. Incorporate Sour Cream and Bananas: Fold in the sour cream and mashed bananas using a rubber spatula. This step is crucial as it adds moisture and richness to the filling, enhancing the overall creaminess and flavor of the cheesecake.
5. Pour into the Crust: Once your filling is well mixed, pour it into the cooled crust, smoothing the top with a spatula for an even surface.
Mastering the Banana Pudding Layer
The banana pudding layer takes this cheesecake to another level, infusing it with the classic flavor that so many people love. Here’s how to prepare this delicious layer.
Breakdown of the Banana Pudding Layer Preparation
1. Ingredients: For the banana pudding layer, you’ll need:
– 1 package (3.4 oz) of instant banana pudding mix
– 2 cups whole milk
– 2 ripe bananas, sliced
– Optional: crushed vanilla wafers or additional graham cracker crumbs for topping
2. Mix the Pudding: In a medium bowl, whisk together the instant pudding mix and whole milk until the mixture thickens, which usually takes about 2 minutes. The result should be a smooth and creamy pudding.
3. Layer the Bananas: Once the pudding is ready, carefully layer the sliced bananas over the cheesecake filling. This adds freshness and a burst of banana flavor that complements the rich filling.
4. Top with Pudding: Pour the prepared pudding over the banana slices, spreading it evenly with a spatula. The pudding layer should be thick and creamy, sitting atop the cheesecake filling beautifully.
5. Chill the Cheesecake: Once assembled, cover the cheesecake with plastic wrap and refrigerate it for at least 4 hours, or overnight if possible. Chilling allows the flavors to meld and the layers to set, making for easier slicing.
By understanding and mastering each of these components, you’re well on your way to creating a Banana Pudding Crunch Cheesecake that will impress family and friends alike. In the next part of this article, we will explore tips for achieving the best results and answer some common questions about this delightful dessert. Stay tuned!
{{image_2}}
Tips for Achieving the Perfect Consistency and Flavor in the Pudding
To create a rich and creamy banana pudding that complements your cheesecake, focus on these essential tips. First, always use ripe bananas for the best flavor; they should be yellow with a few brown spots to ensure optimal sweetness. When preparing the pudding mixture, ensure that your milk is at room temperature. This helps to prevent lumps and allows for a smoother consistency when combined with the other ingredients.
Another critical tip is to whisk the pudding mixture thoroughly. Start by blending the milk and pudding mix, then gradually fold in the mashed bananas and any vanilla extract. This not only enhances the flavor but also ensures that the banana flavor is evenly distributed throughout the pudding. Don’t rush the cooking process; allow the mixture to bubble gently on the stove, stirring constantly. This will ensure that the pudding thickens properly without scorching.
Lastly, allow the pudding to cool completely before assembling the cheesecake layers. This step is crucial, as adding hot pudding to your cheesecake layers can melt them, resulting in an undesirable texture.
Assembling the Cheesecake Layers
Now that you have your cheesecake and pudding ready, it’s time to assemble the layers into a stunning dessert. Begin by spreading a generous layer of the cheesecake filling evenly across the bottom of your prepared crust. Use a spatula to ensure a smooth and even layer, which will serve as the foundation of your dessert.
Once the cheesecake layer is in place, carefully spoon the cooled banana pudding over it. Make sure to spread it evenly without disturbing the cheesecake layer below. It’s essential to work gently to avoid mixing the two layers, as distinct layers enhance the visual appeal and texture of the dessert.
After adding the pudding layer, you can repeat the process by adding another layer of cheesecake filling, followed by another layer of banana pudding. Depending on the depth of your dish, you may have enough for two or three layers of each. The key is to finish with a layer of banana pudding on top.
Chilling times are essential in this step; place the assembled dessert in the refrigerator for at least 4 hours, preferably overnight. This not only allows the layers to set properly but also helps to prevent cracks in the cheesecake. A well-chilled cheesecake is firm, making it easier to slice and present beautifully.
To enhance the visual presentation of your Banana Pudding Crunch Cheesecake, consider using a clear glass dish for assembly. This allows the colorful layers to shine through, enticing everyone with its vibrant appearance. Additionally, use a spatula or a knife dipped in hot water to cut neat slices when serving, ensuring clean edges that showcase the layers.
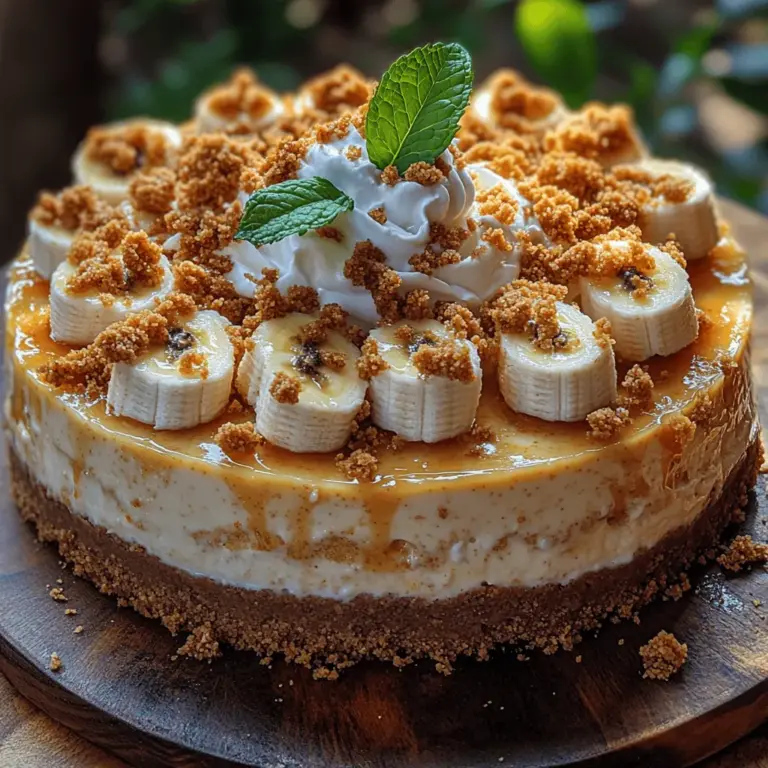
Creating the Crunch Topping
The crunch topping is what truly elevates this dessert, providing a delightful contrast in texture to the creamy layers below. To create this topping, begin by preheating your oven to 350°F (175°C). In a mixing bowl, combine crushed Nilla Wafers, melted butter, and brown sugar. The Nilla Wafers will add a sweet, buttery flavor, while the brown sugar enhances the overall taste with a hint of caramelization.
Mix the ingredients until they are well combined, ensuring the crushed cookies are evenly coated with the butter and sugar mixture. Spread this mixture evenly on a baking sheet lined with parchment paper and bake for about 10 minutes, or until golden brown and fragrant. Keep an eye on the topping as it bakes, as it can go from golden to burnt quickly.
Once out of the oven, allow the crunch topping to cool completely before adding it to your dessert. Once cooled, sprinkle the topping generously over the final layer of banana pudding. This added crunch not only enhances the flavor profile but also provides a satisfying texture that complements the smooth cheesecake and pudding layers.
Final Chill and Serving Suggestions
After assembling your Banana Pudding Crunch Cheesecake, the final chilling step is crucial for melding the flavors and ensuring that your dessert maintains its structural integrity. Allow the cheesecake to chill in the refrigerator for at least 4 hours, or ideally overnight, before serving. This time allows the flavors to develop and the layers to set, ensuring a delightful taste experience in every bite.
When it comes to serving this decadent dessert, presentation is key. Consider using a large, sharp knife to cut clean slices, and serve each portion on a dessert plate. You can elevate the presentation further by garnishing with dollops of freshly whipped cream, banana slices, and a sprig of mint for a pop of color. This not only enhances the visual appeal but also adds an extra layer of freshness to each serving.
For an added touch, consider drizzling a bit of caramel sauce over the top just before serving. This sweet addition pairs perfectly with the banana and adds a luxurious finish. Additionally, if you want to create a more whimsical presentation, you can layer individual servings in mason jars, which are perfect for casual gatherings or picnics.
Nutritional Information and Serving Size
Understanding the nutritional content of your Banana Pudding Crunch Cheesecake can help you enjoy it guilt-free. Each slice is approximately 300-350 calories, depending on portion size and specific ingredient brands used. The dessert is rich in carbohydrates and contains a moderate amount of protein from the cream cheese and pudding. It is essential to keep portion sizes in mind, especially for those who are conscious of their dietary intake.
If you are accommodating dietary preferences, consider using low-fat cream cheese or sugar-free pudding mix to lighten the recipe. Additionally, gluten-free Nilla Wafers are available for those with gluten sensitivities, allowing everyone to enjoy this delightful cheesecake. Remember that while this dessert is indulgent, it can be enjoyed in moderation as part of a balanced diet.
Conclusion
Creating and enjoying a Banana Pudding Crunch Cheesecake is a delightful experience that brings together the comforting flavors of banana pudding with the rich creaminess of cheesecake. The combination of textures—from the smooth layers to the crunchy topping—makes this dessert a standout at any gathering, be it a holiday celebration or a simple family dinner.
Encouraging you to try out this recipe for your next special occasion, the joy of sharing homemade desserts with loved ones is truly unparalleled. The delightful combination of flavors and textures will leave a lasting impression on your guests, making it a memorable addition to your dessert repertoire.
So gather your ingredients, follow the steps outlined, and indulge in the deliciousness of this Banana Pudding Crunch Cheesecake. Your taste buds will thank you, and your friends and family will be eager to come back for seconds!
