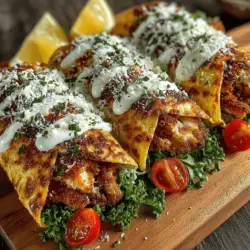
Crunchy Caesar Chicken Tortilla Pockets Recipe
If you’re on the lookout for a dish that marries convenience with flavor, the Crunchy Caesar Chicken Tortilla Pockets should be at the top of your list. This recipe is not only a delight to the palate but also an ideal solution for busy weeknights and casual gatherings. Imagine a warm, soft tortilla enveloping tender, juicy chicken that’s been perfectly seasoned and coated for an irresistible crunch. Add in the fresh crispness of Romaine lettuce and the tangy richness of Caesar dressing, and you have a meal that will satisfy both adults and children alike.
The appeal of Crunchy Caesar Chicken Tortilla Pockets lies in their versatility. They can serve as a quick dinner option, a packed lunch, or even an appetizer at your next gathering. The combination of textures—from the crunchy chicken to the soft tortilla and crisp vegetables—creates a delightful eating experience. Not only are they easy to prepare, but they also offer a balanced mix of flavors that cater to a variety of tastes, making them a family favorite.
Understanding the Ingredients
To truly appreciate the Crunchy Caesar Chicken Tortilla Pockets, it’s essential to understand the role of each ingredient in this delicious dish. The primary components include chicken breasts, buttermilk, panko breadcrumbs, tortillas, fresh vegetables, and Caesar dressing. Each ingredient contributes not only to the flavor but also to the overall texture and nutritional profile of the meal.
Chicken Breasts: The star of this recipe is undoubtedly the chicken breasts. They are a lean source of protein, making them a healthy choice for any meal. When marinated properly, they absorb flavors and stay juicy during cooking, ensuring every bite is both satisfying and delicious.
Buttermilk: Marinating the chicken in buttermilk is a game changer. The acidity in buttermilk helps tenderize the meat, resulting in succulent chicken that practically melts in your mouth. Additionally, the creamy texture of buttermilk adheres well to the chicken, allowing for an even coating of breadcrumbs.
Panko Breadcrumbs: Unlike traditional breadcrumbs, panko breadcrumbs are coarser and lighter, providing an extra crunch that elevates the dish. Their unique texture is perfect for achieving that satisfying crunch when the chicken is fried or baked, making this dish a textural delight.
Fresh Vegetables: Romaine lettuce and tomatoes add a refreshing crunch and a burst of color to the tortilla pockets. Romaine is particularly beneficial due to its high fiber content, which aids digestion, while tomatoes are rich in vitamins C and K, making this dish not just tasty but nutritious as well.
Caesar Dressing: The dressing is what ties all the flavors together in this recipe. Its creamy texture and bold flavor profile, which typically includes garlic, anchovies, and Parmesan cheese, enhance the overall taste of the dish. The zesty notes complement the savory chicken and fresh vegetables, creating a harmonious blend of flavors.
Marinating the Chicken
Marinating the chicken is a crucial step in achieving the best results for your Crunchy Caesar Chicken Tortilla Pockets. Here’s a step-by-step guide on how to marinate your chicken breasts effectively:
1. Choose the Right Chicken: Start with boneless, skinless chicken breasts for even cooking. If your chicken breasts are particularly thick, consider pounding them to an even thickness to ensure they cook uniformly.
2. Prepare the Marinade: In a medium bowl, combine buttermilk with your choice of spices, such as garlic powder, onion powder, salt, and pepper. These spices will enhance the flavor of the chicken. You can also add a splash of hot sauce for a bit of heat if desired.
3. Submerge the Chicken: Place the chicken breasts in the buttermilk mixture, ensuring they are fully submerged. This will allow the flavors to penetrate the meat thoroughly.
4. Marination Time: Cover the bowl with plastic wrap or transfer the chicken and marinade to a resealable plastic bag. Refrigerate for at least 30 minutes, though marinating for 2 to 4 hours (or even overnight) is ideal for maximum tenderness and flavor. Avoid marinating for longer than 24 hours, as the acid can start to break down the chicken too much, resulting in a mushy texture.
5. Remove and Drain: Once the marinating time is up, remove the chicken from the refrigerator and drain off the excess buttermilk. Pat the chicken dry with paper towels to ensure the coating adheres properly.
Preparing the Crunchy Coating
Creating the perfect crunchy coating for your chicken is essential to the success of the Crunchy Caesar Chicken Tortilla Pockets. Here’s how to prepare the panko breadcrumb coating:
1. Season the Breadcrumbs: In a shallow dish, combine panko breadcrumbs with seasonings such as Italian seasoning, paprika, and a pinch of salt. This step is crucial, as seasoned breadcrumbs will add depth to the flavor of the coating.
2. Set Up a Breading Station: Prepare a breading station with three shallow dishes: one for flour (optional), one for beaten eggs, and one for the seasoned panko breadcrumbs. This makes it easy to coat each piece of chicken evenly.
3. Coat the Chicken: Start by dredging each piece of marinated chicken in flour (if using), shaking off any excess. Next, dip the chicken into the beaten eggs, allowing any excess to drip off, and finally coat it in the seasoned panko breadcrumbs. Press down gently to ensure the breadcrumbs adhere well.
4. Ensure Even Coverage: For the best results, make sure each piece of chicken is evenly coated with panko. This will create a uniform crust that is both crunchy and flavorful when cooked.
5. Prepare for Cooking: Place the breaded chicken on a baking sheet lined with parchment paper or a lightly greased rack. This allows for better air circulation, ensuring an even cook and a crispier finish.
By following these steps, you’ll have flavorful, tender chicken coated in a crunchy layer that will be the highlight of your Crunchy Caesar Chicken Tortilla Pockets. Stay tuned for the next part of the recipe, where we will delve into the cooking process and assembly of these delicious tortilla pockets.
{{image_2}}
Cooking the Chicken to Perfection
To create the ultimate Crunchy Caesar Chicken Tortilla Pockets, the first step is to cook the chicken to absolute perfection. This crucial process directly influences the dish’s flavor, texture, and overall satisfaction.
Instructions for Cooking the Chicken
1. Preparation: Start by seasoning your chicken breasts with salt, pepper, and any additional spices you prefer, such as garlic powder or paprika, to enhance the flavor.
2. Cooking Method: For optimal results, you can either grill or pan-sear the chicken. If grilling, preheat your grill to medium-high heat. For pan-searing, heat a couple of tablespoons of olive oil in a skillet over medium-high heat.
3. Cooking Time: Cook the chicken for about 6-7 minutes on each side, depending on the thickness of the breasts. The key is to reach an internal temperature of 165°F (75°C) to ensure food safety.
4. Monitoring for Moisture and Crunch: To lock in moisture while achieving that coveted crunch, avoid flipping the chicken too often. Let it sear on one side before turning. You can cover the skillet briefly to help the chicken cook through while retaining juices.
5. Achieving a Golden-Brown Crust: To achieve a beautiful golden-brown crust, resist the urge to move the chicken too early. A good sear will naturally release the chicken from the pan. If the chicken sticks, it isn’t ready to be flipped yet.
Importance of Cooking Time and Temperature
Monitoring your cooking time and temperature is vital for both safety and quality. Undercooked chicken can pose health risks, while overcooked chicken can become dry and tough. Using a meat thermometer will help you ensure that your chicken is cooked perfectly every time.
Assembling the Tortilla Pockets
Once your chicken is perfectly cooked, it’s time to assemble the tortilla pockets. This step is where creativity and flavor come together to create a visually appealing and delicious meal.
Step-by-Step Assembly Process
1. Prepare the Tortillas: Start with large flour or whole wheat tortillas. They provide a sturdy base for filling and will hold up well under the weight of the ingredients.
2. Layering Ingredients:
– Base Layer: Begin by placing a generous handful of chopped romaine lettuce at the center of the tortilla. This adds a crisp texture and freshness.
– Chicken: Next, slice your cooked chicken into thin strips and lay them over the lettuce.
– Toppings: Add diced tomatoes, sliced cucumbers, and any other preferred vegetables. The colors and textures not only enhance the flavor but also make the dish visually appealing.
– Cheese: Sprinkle shredded Parmesan cheese over the top. This will melt slightly when the wrap is toasted, adding a rich flavor that complements the Caesar dressing.
3. Drizzle with Dressing: Finally, drizzle Caesar dressing over the entire assembly. The dressing binds the ingredients together and adds creaminess, enhancing the overall flavor profile.
Visual Appeal
To create an appetizing presentation, ensure that colorful ingredients are visible through the transparent tortilla. Layering in a way that showcases the vibrant greens, reds, and yellows will entice anyone who sees your creation.
Wrapping and Toasting the Tortilla Pockets
Now that your tortilla pockets are assembled, it’s time to wrap and toast them to perfection.
Techniques for Secure Wrapping
1. Folding: Start by folding the sides of the tortilla inward, covering the filling. Then, fold the bottom of the tortilla up over the filling, ensuring everything is enclosed.
2. Rolling: Gently roll the tortilla away from you, keeping it snug but not too tight, as this can cause the fillings to spill out.
3. Sealing: If you’re worried about spillage, you can secure the wrap with a toothpick or wrap it in parchment paper until ready to eat.
Optional Toasting for Added Crunch
Toasting the tortilla pockets can elevate the dish further. Here’s how to do it:
1. Preheat a Skillet: Heat a non-stick skillet over medium heat. You can lightly grease the pan with a bit of olive oil if desired.
2. Toasting: Place the wrapped tortilla pockets seam-side down in the skillet. Toast for about 3-4 minutes on each side or until they are golden brown and crispy.
3. Avoiding Burn: Keep an eye on the tortillas to prevent burning. If they’re browning too quickly, reduce the heat slightly.
Serving Suggestions
The Crunchy Caesar Chicken Tortilla Pockets can be served as a standalone meal or paired with delightful sides to create a more complete dining experience.
Side Dishes and Accompaniments
1. Fresh Salads: A simple arugula salad with lemon vinaigrette can complement the richness of the chicken and dressing.
2. Chips and Dip: Serve with homemade tortilla chips and salsa or guacamole for an added crunch and flavor.
3. Vegetable Sticks: Carrot, celery, and bell pepper sticks with hummus provide a healthy and colorful side.
Presentation Suggestions
For an appealing dining experience, plate the tortilla pockets on a colorful platter. Consider garnishing with fresh herbs or additional Parmesan shavings. Placing a small bowl of extra Caesar dressing on the side allows guests to customize their flavor.
Variations and Substitutions
This recipe is versatile and can accommodate various dietary preferences:
– For Gluten-Free Options: Use gluten-free tortillas to make the dish suitable for those with gluten sensitivities.
– Vegetarian Version: Substitute chicken with grilled zucchini, mushrooms, or chickpeas for a satisfying vegetarian alternative.
– Dairy-Free: For a dairy-free option, skip the cheese or use a vegan cheese substitute.
Conclusion
The Crunchy Caesar Chicken Tortilla Pockets are not just a meal; they are a delightful culinary adventure. With layers of flavor and texture, they provide a satisfying option for lunch, dinner, or even a picnic treat. This recipe is perfect for busy weeknights or casual gatherings, delivering a quick and delicious meal that everyone will love.
By trying this recipe, you can bring a fresh twist to your family dinners or gatherings. It’s an easy way to please a crowd while providing a nutritious and flavorful option. Don’t hesitate to experiment with your favorite ingredients and toppings, making these tortilla pockets your own signature dish. Enjoy the process and the delicious results!