Introduction
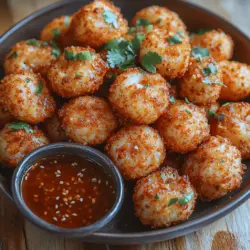
Crispy Shrimp Balls with Sweet Chili Sauce are an irresistible appetizer that brings a burst of flavor to any gathering. These delightful morsels combine the sweetness of shrimp with a medley of aromatic ingredients, creating a dish that is both satisfying and impressive. Known for their crunchy exterior and succulent interior, crispy shrimp balls are perfect for entertaining guests or enjoying a cozy night in.
The unique flavor profile of these shrimp balls is complemented beautifully by the sweet chili sauce, which adds a touch of heat and sweetness that enhances the overall experience. This dynamic dipping sauce, often found in Asian cuisine, perfectly balances the savory elements of the shrimp, creating a harmony that is hard to resist. Whether served at a party or as a snack, crispy shrimp balls are sure to be a hit.
In this article, we’ll guide you through the process of making these delicious shrimp balls from scratch. You can expect detailed insights into selecting the best ingredients, step-by-step preparation instructions, and frying techniques that will ensure your shrimp balls turn out perfectly crispy every time.
Understanding the Ingredients
Creating the perfect crispy shrimp balls starts with understanding the key ingredients that contribute to their fantastic flavor and texture. Here’s a closer look at what you’ll need for this recipe.
Raw Shrimp
The star of our dish is, of course, raw shrimp. When it comes to shrimp, freshness and quality are paramount. Look for shrimp that has a firm texture and a clean, ocean-like smell. Fresh shrimp will provide a sweeter, more delicate flavor, while frozen shrimp can work well if thawed properly. If you choose to use frozen shrimp, ensure that it is fully defrosted and patted dry to prevent excess moisture from affecting the mixture.
Breadcrumbs
Breadcrumbs play a crucial role in achieving that desirable crispy texture. They provide a crunchy exterior that contrasts beautifully with the tender shrimp inside. For the best results, use panko breadcrumbs, which are larger and airier than traditional breadcrumbs, leading to a lighter and crispier coating. If panko is not available, you can substitute regular breadcrumbs, but be aware that the texture may not be as crispy.
Green Onions, Garlic, and Ginger
Flavor enhancers such as green onions, garlic, and ginger are essential for adding depth to the shrimp balls. Green onions provide a mild onion flavor and a touch of color, while garlic and ginger introduce a fragrant spiciness that elevates the dish. These aromatic ingredients work in conjunction to create a well-rounded flavor profile that keeps you coming back for more.
Fish Sauce
Fish sauce is a traditional ingredient in many Asian dishes, and it delivers a powerful umami boost to our shrimp balls. This fermented condiment adds a salty, savory depth that enhances the overall flavor without overpowering the other ingredients. If you prefer a vegetarian option, consider using soy sauce or a mushroom-based substitute to achieve a similar effect.
Egg and Cornstarch
For binding the shrimp mixture together, we’ll use egg and cornstarch. The egg acts as a cohesive element that keeps the ingredients from falling apart during frying, while cornstarch helps to create a light and crispy texture. When combined, they ensure that each shrimp ball holds its shape and achieves the perfect crispiness when fried.
Sweet Chili Sauce Components
Now, let’s talk about the sweet chili sauce that accompanies these shrimp balls. This sauce is a cornerstone of the dish, offering a sweet, tangy flavor that pairs perfectly with the shrimp. The primary components of a good sweet chili sauce include:
– Sweet Chili Sauce: This sauce serves as the base flavor, often made from red chili peppers, sugar, and vinegar. Its balance of sweet and spicy notes makes it a versatile condiment for various dishes beyond shrimp balls.
– Rice Vinegar: Adding rice vinegar to your sweet chili sauce contributes a mild acidity that brightens the overall flavor while enhancing the sweetness without making it overly sour.
– Sesame Oil: A drizzle of sesame oil can elevate your sweet chili sauce with its nutty aroma and flavor, making it richer and more complex.
– Lime Juice: Fresh lime juice introduces a zesty freshness, cutting through the sweetness and providing a refreshing finish that complements the shrimp.
Preparing the Shrimp Balls
Now that we have a solid understanding of our ingredients, let’s move on to the preparation process for our crispy shrimp balls. This step-by-step guide will ensure that you create a cohesive mixture with the perfect texture.
Step 1: Preparing the Shrimp
To begin, you’ll want to prepare the raw shrimp. If using whole shrimp, peel and devein them, removing the shells and tails. Rinse them under cold water and pat them dry with a paper towel. This step is essential, as excess moisture can result in a soggy mixture.
Next, roughly chop the shrimp into smaller pieces before adding them to the food processor. This will help achieve a uniform texture without over-processing.
Step 2: Using a Food Processor
The food processor is your best friend in achieving the right texture for the shrimp balls. Add the chopped shrimp to the food processor along with the green onions, garlic, ginger, fish sauce, egg, and cornstarch. Pulse the mixture until it is finely chopped but not completely pureed. The goal is to maintain some texture while ensuring that everything is well-combined.
Be cautious not to over-process the shrimp; doing so can lead to a gummy texture rather than the desired light and fluffy consistency. Stop pulsing once you achieve a mixture that holds together when squeezed in your hand.
Step 3: Combining Ingredients Effectively
Once you have your shrimp mixture ready, it’s time to incorporate the breadcrumbs. Transfer the shrimp mixture to a large bowl and gently fold in the breadcrumbs. This step is vital as it helps to achieve that crispy exterior when frying. Ensure that the breadcrumbs are evenly distributed throughout the mixture, creating a cohesive blend.
Step 4: Shaping the Balls
Now comes the fun part—shaping the shrimp balls! To ensure even cooking and prevent sticking, moisten your hands with a bit of water before forming the balls. This will help the mixture glide easily, allowing you to shape them without the mixture adhering to your fingers.
Take a tablespoon-sized portion of the mixture and roll it into a ball. Aim for uniform size, approximately 1 inch in diameter, to ensure that all shrimp balls cook evenly. Repeat this process until all of the mixture has been shaped into balls.
Step 5: Preparing for Frying
Before frying, it’s essential to prepare your workspace and gather all necessary tools. Set up a frying station with a deep pan or a heavy-bottomed skillet filled with oil, enough to submerge the shrimp balls. Heat the oil over medium-high heat until it reaches around 350°F (175°C).
To test if the oil is hot enough, drop a small piece of the shrimp mixture into the oil; if it sizzles and rises to the surface, it’s ready for frying.
Frying Techniques for Perfectly Crispy Shrimp Balls
The frying process is where the magic happens, transforming the raw shrimp mixture into golden, crispy balls. Here are some tips to ensure your shrimp balls turn out perfectly crispy every time:
– Fry in Batches: Avoid overcrowding the pan, as this can lower the oil temperature and lead to greasy shrimp balls. Fry in small batches, giving each ball enough space to cook evenly.
– Monitor the Temperature: Maintain a consistent oil temperature throughout the frying process. If the oil cools down too much, the shrimp balls will absorb excess oil and become soggy. Conversely, if the oil is too hot, the exterior may burn before the inside is fully cooked.
– Drain Excess Oil: Once the shrimp balls are golden brown and cooked through (approximately 3-4 minutes per side), remove them from the oil using a slotted spoon and transfer them to a paper towel-lined plate. This will help absorb any excess oil, keeping your shrimp balls crispy.
With these techniques in mind, you are well on your way to creating crispy shrimp balls that are sure to impress. In the next part of the article, we will dive deeper into additional frying tips, serving suggestions, and how to make the perfect sweet chili sauce to accompany your delicious shrimp balls. Stay tuned to elevate your appetizer game and delight your taste buds!
{{image_2}}
Detailed Instructions on Frying
Frying crispy shrimp balls to perfection requires attention to detail, particularly concerning oil temperature, timing, and the handling of the shrimp balls themselves. Here’s how to achieve that golden-brown crunch:
1. Heat the Oil: Begin by selecting a heavy-bottomed pot or deep fryer for frying your shrimp balls. Fill it with enough oil (about 2-3 inches deep) to allow the shrimp balls to float freely while frying. Heat the oil over medium-high heat until it reaches the ideal frying temperature of 350°F (175°C).
2. Measuring Oil Temperature: To accurately measure the oil temperature, you can use a deep-fry thermometer. If you don’t have one, you can test the readiness of the oil by dropping a small piece of bread into it. If the bread sizzles and browns within 60 seconds, the oil is ready for frying.
3. Avoiding Overcrowding: It’s crucial to fry the shrimp balls in batches. Overcrowding the pan can significantly lower the oil temperature, preventing the shrimp balls from crisping up properly. Ideally, fry 4-6 balls at a time, depending on the size of your pot.
4. Visual Cues During Frying: As you fry the shrimp balls, keep an eye out for visual cues. The shrimp balls will initially sink to the bottom, but as they cook, they will begin to rise and bubble. Turn them gently with a slotted spoon to ensure even cooking.
5. Color Changes and Cooking Times: The frying process should take about 3-4 minutes per batch. Watch for the color change; they should turn a beautiful golden brown. If they brown too quickly, reduce the heat slightly; if they are not browning at all, increase the heat.
Crafting the Sweet Chili Sauce
A perfect accompaniment to crispy shrimp balls is a homemade sweet chili sauce, which is both quick and easy to prepare. Here’s how to make it:
1. Ingredients: Gather the following ingredients for the sweet chili sauce:
– 1 cup of sugar
– 1 cup of water
– ½ cup of rice vinegar
– 2-3 tablespoons of chili garlic sauce (adjust based on spice preference)
– 1 teaspoon of cornstarch mixed with 2 teaspoons of water (for thickening)
– Optional: minced garlic or ginger for added flavor
2. Cooking the Sauce: In a saucepan, combine the sugar, water, and rice vinegar over medium heat. Stir until the sugar dissolves, then bring it to a simmer.
3. Add Spice: Once simmering, add the chili garlic sauce for that signature sweet and spicy kick. If you want a milder sauce, start with less and adjust to taste.
4. Thickening the Sauce: After the sauce has simmered for about 5 minutes, stir in the cornstarch mixture. Continue to cook for another 1-2 minutes, allowing the sauce to thicken. If desired, you can incorporate minced garlic or ginger at this stage for additional depth.
5. Final Touches: Remove from heat and let the sauce cool. It will continue to thicken as it cools. This simple homemade sauce will complement the crispy shrimp balls perfectly, enhancing their flavors without overwhelming them.
Serving Suggestions and Presentation
Presentation plays a key role in the enjoyment of your crispy shrimp balls. Here are some creative ideas for serving them:
1. Plating Ideas: Arrange the fried shrimp balls on a large platter with the sweet chili sauce in a small bowl at the center for easy dipping. You can also skewer the shrimp balls on sticks for a fun and easy-to-eat appetizer.
2. Garnishing Options: Enhance the visual appeal by garnishing the platter with freshly chopped cilantro, sliced green onions, or lemon wedges. These not only add color but also provide a fresh burst of flavor.
3. Party Arrangements: For gatherings, consider serving the shrimp balls in small individual cups or on a tiered serving stand. This not only looks elegant but also makes it easier for guests to help themselves.
4. Suggested Pairings: Crispy shrimp balls pair wonderfully with a variety of beverages. Consider serving them with cold beers, light white wines, or cocktails like mojitos or margaritas. For a non-alcoholic option, a refreshing iced tea or sparkling water with lime would be delightful.
Health Considerations and Nutritional Information
While crispy shrimp balls are undeniably delicious, it’s important to be mindful of their nutritional content and preparation methods:
1. Nutritional Analysis: A typical serving of crispy shrimp balls (about 3-4 pieces) contains approximately:
– Calories: 250-300
– Protein: 15-20g
– Fat: 15-20g
– Carbohydrates: 20-25g
– Fiber: 1-2g
These values can vary based on the specific ingredients used and the cooking process.
2. Portion Control: When serving appetizers like shrimp balls, it’s easy to lose track of portion sizes. Consider serving them alongside a fresh salad or vegetable platter to create a balanced meal and encourage moderation.
3. Healthier Preparation Methods: If you’re looking for a healthier alternative, consider baking the shrimp balls instead of frying. Preheat your oven to 400°F (200°C) and place the shrimp balls on a parchment-lined baking sheet. Spray them lightly with cooking oil and bake for about 20-25 minutes, turning halfway through, until they are golden brown and cooked through. This method reduces oil content and calories while still delivering a crisp texture.
Conclusion
Crispy shrimp balls with sweet chili sauce are a delightful treat that is perfect for any occasion, from casual family dinners to festive gatherings. The combination of crunchy texture and the sweet-spicy flavor of the sauce creates a mouthwatering experience that is hard to resist.
Making these shrimp balls at home allows you to customize the flavors to your liking and ensures freshness. Sharing these delicious appetizers with family and friends not only brings joy but also makes for unforgettable moments around the dinner table. So, gather your ingredients, channel your inner chef, and enjoy the satisfaction of creating this delectable dish from scratch. Happy cooking!