No-Bake S’mores Cheesecake Jars: A Sweet Escape into Summer Nostalgia
In recent years, the trend of no-bake desserts has surged in popularity, capturing the hearts of home bakers and dessert lovers alike. These easy-to-make treats offer a perfect combination of convenience and flavor, allowing anyone to whip up delicious desserts without the need for an oven. Among these delightful options, the No-Bake S’mores Cheesecake Jars stand out as a quintessential summer treat that evokes feelings of nostalgia while delivering a modern twist on the classic campfire favorite.
S’mores, a beloved summertime indulgence, are synonymous with warm evenings spent around a flickering campfire, roasting marshmallows and sandwiching them between graham crackers and chocolate. The rich flavors of gooey marshmallow, melted chocolate, and crunchy graham crackers have become emblematic of outdoor gatherings, family camping trips, and childhood memories. The No-Bake S’mores Cheesecake Jars encapsulate this nostalgic experience in a fun, portable format, perfect for parties, picnics, or simply satisfying your sweet tooth at home.
This dessert is not just about evoking memories; it also brings together an enticing blend of flavors and textures. The creamy cheesecake filling contrasts beautifully with the crunchy graham cracker crust, while the chocolate chips and mini marshmallows add bursts of sweetness and chewiness. Each jar is a delightful layering of ingredients that come together to create a visually appealing and deliciously satisfying treat.
Ingredients Breakdown
To embark on your culinary adventure with No-Bake S’mores Cheesecake Jars, you’ll need a handful of simple yet flavorful ingredients. Let’s break down each component that contributes to the overall deliciousness of this dessert.
Graham Cracker Crumbs
The foundation of any great S’mores-inspired dessert, graham cracker crumbs create the base of the crust in this recipe. Their slightly sweet and toasty flavor profile perfectly mimics the traditional S’mores experience. When crushed into fine crumbs, they can be easily combined with melted butter to form a sturdy, crumbly base that holds the layers of the cheesecake filling and toppings together.
Cream Cheese
At the heart of the cheesecake filling lies cream cheese, which provides the rich and creamy texture that makes cheesecakes so irresistible. When softened and whipped, cream cheese becomes light and airy, allowing it to blend seamlessly with other ingredients. It’s essential to use high-quality cream cheese for this recipe, as it will enhance the overall flavor and creaminess of the filling.
Heavy Whipping Cream
To elevate the texture of the cheesecake filling, heavy whipping cream plays a crucial role. When whipped to soft peaks, it adds a lightness that balances the richness of the cream cheese. This combination creates a filling that is both indulgent and fluffy, making each spoonful a delightful experience. The heavy cream also helps to stabilize the filling, ensuring that it holds its shape in the jar.
Chocolate Chips and Mini Marshmallows
No S’mores dessert would be complete without the quintessential elements of chocolate and marshmallows. Semi-sweet or milk chocolate chips are typically used in this recipe, providing that familiar chocolatey goodness that melts in your mouth. Mini marshmallows add a fun chewy texture and a burst of sweetness that enhances the overall flavor profile. For a more gourmet touch, consider using flavored chocolate chips, such as dark chocolate or even caramel, to cater to your taste preferences.
Optional Ingredients
While the core components create a fantastic base for your No-Bake S’mores Cheesecake Jars, you can also get creative with optional ingredients. For instance, adding a drizzle of chocolate sauce or caramel on top can elevate the visual appeal and flavor. Additionally, garnishing with toasted mini marshmallows or even a sprinkle of sea salt can add an unexpected twist that delights the palate.
Step-by-Step Instructions
Now that you have an understanding of the ingredients, it’s time to dive into the step-by-step instructions for creating your No-Bake S’mores Cheesecake Jars. This process is straightforward, making it an excellent choice for bakers of all skill levels.
Preparing the Crust
The first step in making these delightful jars is to prepare the graham cracker crust. Begin by crushing the graham crackers into fine crumbs. You can achieve this by placing them in a zip-top bag and using a rolling pin or by pulsing them in a food processor. Aim for a texture similar to sand, as this will help create a cohesive crust.
Next, combine the graham cracker crumbs with melted butter. The melted butter acts as a binding agent, helping the crumbs hold together when pressed into the jars. The typical ratio is about two tablespoons of melted butter for every cup of graham cracker crumbs. Mix until the crumbs are evenly coated and have a wet, sand-like consistency.
Layering the Crust
Once your graham cracker mixture is ready, it’s time to layer it into the jars. Use small jars or dessert cups for an appealing presentation. Start by adding a few spoonfuls of the crust mixture to each jar, ensuring you distribute it evenly. Using the back of a spoon or your fingers, gently press the mixture down to create a firm base. The goal is to achieve a crust that is approximately half an inch thick, providing a sturdy foundation for the cheesecake filling.
Making the Cheesecake Filling
With the crust in place, it’s time to prepare the creamy cheesecake filling. In a mixing bowl, beat the softened cream cheese until it becomes smooth and creamy. This step is crucial, as it helps prevent lumps in your filling. Gradually add in powdered sugar and vanilla extract, mixing until fully incorporated.
In a separate bowl, whip the heavy cream until soft peaks form. This step requires a bit of attention; over-whipping can lead to grainy cream, while under-whipping will not provide the desired light texture. Once the cream reaches soft peaks, gently fold it into the cream cheese mixture. This folding technique is essential to maintain the lightness of the whipped cream while ensuring a well-combined filling.
With the crust prepared and the cheesecake filling ready, you are well on your way to assembling your No-Bake S’mores Cheesecake Jars. The following steps will involve layering the cheesecake filling with chocolate chips and mini marshmallows, culminating in a dessert that is not only delicious but also visually stunning. Stay tuned for the next part, where we’ll delve into the assembly and final touches that make these jars truly irresistible.
{{image_2}}
Detailed Instructions on Mixing Cream Cheese
To start your No-Bake S’mores Cheesecake Jars, it’s essential to create a creamy and smooth filling that will be the star of your dessert. Begin by taking 16 ounces of cream cheese, ensuring it is at room temperature for easier mixing. In a large mixing bowl, combine the cream cheese with 1 cup of granulated sugar and 1 teaspoon of vanilla extract.
Using an electric mixer on medium speed, beat the mixture until it becomes light and fluffy, usually about 2-3 minutes. This process is crucial as it not only combines the ingredients but also incorporates air, giving your cheesecake a delightful texture. Stop occasionally to scrape down the sides of the bowl, ensuring there are no lumps and that everything is evenly mixed. Achieving a smooth consistency is paramount; you don’t want any lumps of cream cheese marring the creamy texture of your cheesecake filling.
Whipping the Cream
Next, it’s time to whip 1 cup of heavy cream. This step is vital for creating the light and airy texture that makes no-bake cheesecakes so appealing. Pour the heavy cream into a clean bowl, and using a clean electric mixer, whip it on medium-high speed. You’ll want to watch closely as the cream starts to thicken.
Techniques for Achieving the Perfect Peaks in Whipped Cream
Continue whipping until soft peaks form, which means when you lift the beaters, the cream should hold a peak that gently falls over. For stiffer peaks—ideal for this cheesecake—whip until the cream holds a firm peak but be cautious not to over-whip, as this can turn the cream grainy and eventually lead to butter.
Explanation of the Folding Technique to Maintain Lightness
Once your whipped cream is ready, it’s time to incorporate it into your cream cheese mixture. This is where the folding technique comes into play. Using a rubber spatula, add a third of the whipped cream to the cream cheese mixture. Gently fold the whipped cream into the mixture by scraping the spatula down the side of the bowl and lifting it over the top. Rotate the bowl as you fold to evenly distribute the whipped cream without deflating it. Repeat this process until all the whipped cream is combined, ensuring a light and airy filling.
Incorporating Chocolate and Marshmallows
The next step is to add in the chocolate and marshmallows that will give your cheesecake its S’mores flavor. Gently fold in ½ cup of mini chocolate chips and ½ cup of mini marshmallows into the cheesecake mixture.
Tips for Evenly Distributing Chocolate Chips and Mini Marshmallows Without Deflating the Mixture
To ensure even distribution, sprinkle the chocolate chips and marshmallows over the surface of the cheesecake mixture before folding. This method minimizes the risk of deflating the whipped cream. Use a gentle touch, and be careful not to over-mix, as you want to maintain that light, fluffy texture.
Layering the Cheesecake
Now that your cheesecake filling is ready, it’s time to layer it into your jars. Start by spooning a layer of the prepared crust into the bottom of each jar, filling them about a third of the way up.
Best Practices for Layering and Ensuring Aesthetic Appeal in Jars
Follow this with a generous layer of the cheesecake filling, smoothing it out with the back of a spoon or an offset spatula. Alternate layers of crust and filling until you reach the top of the jar. Aim for about three layers in total, finishing with a layer of cheesecake filling on top for a polished look.
Techniques for Smoothing the Tops
For a clean finish, use a small offset spatula or the back of a spoon to smooth the tops of each jar after adding the final layer of cheesecake filling. This attention to detail will enhance the overall presentation of your dessert.
Finishing Touches
Now, let’s talk about the finishing touches that will elevate your No-Bake S’mores Cheesecake Jars. Garnishing is not just for aesthetics; it adds to the flavor and texture of your dessert.
Importance of Garnish for Visual Appeal and Taste Enhancement
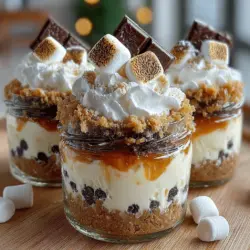
Top each jar with a sprinkle of crushed graham crackers, a few additional mini marshmallows, and a drizzle of melted chocolate if desired. This not only looks appealing but also provides a delightful contrast of textures with the creamy cheesecake.
Suggestions for Additional Garnishing Options
For an extra touch of indulgence, consider adding a dollop of whipped cream on top or even a toasted marshmallow for a campfire feel. You can toast the marshmallows using a kitchen torch for that classic S’mores flavor and look.
Chilling and Serving
Chilling the cheesecake jars is a crucial step in achieving the perfect texture and flavor. Refrigerate the jars for at least 4 hours, but if you can let them chill overnight, that’s even better. This time allows the flavors to meld beautifully and the filling to set properly.
Importance of Chilling for Flavor Melding and Texture Setting
The chilling process not only solidifies the cheesecake filling but also enhances the overall flavor profile, making each bite a delightful experience. The longer you allow the jars to chill, the more pronounced the flavors of the chocolate and marshmallows will become.
Recommended Chilling Time for Optimal Results
For optimal results, aim for a chilling time of 6-8 hours. This will ensure that your No-Bake S’mores Cheesecake Jars are perfectly set and ready to impress when it comes time to serve.
Serving Suggestions: Presentation Ideas and Pairing with Ice Cream
When ready to serve, consider presenting the jars on a rustic wooden platter to give that campfire vibe. Pair your cheesecake jars with a scoop of vanilla ice cream for a delightful contrast of temperatures and textures. A drizzle of chocolate sauce or caramel sauce can also add an extra layer of flavor.
Conclusion
In summary, these No-Bake S’mores Cheesecake Jars are a simple yet indulgent dessert that captures the nostalgic flavors of childhood campfire treats. With just a few steps and ingredients, you can create a delightful dessert that’s perfect for gatherings, parties, or a personal indulgence on a cozy night in.
Encourage your friends and family to try this recipe and experience the joy of creating something delicious that evokes memories of summer nights and sweet treats. The combination of creamy cheesecake, crunchy graham cracker, and gooey marshmallows will surely delight anyone who takes a spoonful. Enjoy the process of making these jars and savor the delightful results that will have everyone asking for seconds!